Friday, September 30, 2011

Plastic Bag Aquarium

We made plastic bag aquariums!  This is such an incredibly easy project and FUN too! All you need is a plastic bag with a zipper top,  permanent markers, and some hair gel.   Here is one that Cassie did! There is something satisfying about squooshing your fingers across the gel!


First place your plastic bag over a white piece of paper so you can see what you are drawing.  Then start drawing a fish scene with your permanent markers.


When you are done with your drawing, add some blue hair gel in the bag.  You could also use clear hair gel and add a few drops of blue food coloring! (that is what we did!)  Here is my fish bag creation.


You could also add some glitter to give it some sparkle!  We had a lot of FUN and they look great on our white refrigerator! You could also hang them as sun catchers on the window!!!  Here is Cassie's fishy bag again!


Hope you enjoy creating your own Fishy Bag Aquariums!
This post is linked to:

Wednesday, September 28, 2011

Matboard Collage

We made Matboard Collages! You can easily get scraps of this wonderful material at your local framing shop! It is usually absolutely free because there are always scraps left over from making mats for frames.  We've used matboard for backgrounds of many projects or whenever we have needed stiff cardboard. Here is one of Cassies' creations titled: Person, House, and Building:


To begin this project,  I pre-cut a bunch of geometric shapes and strips since matboard is rather difficult to cut for a 5 year old!   Matboard is satisfying to work with because of all the fun colors and textures ----some were even metallic and marbled!!!  You never know what you might get when you pick up scraps at the frame shop!


We used a larger piece of matboard for our background,  but you could use construction paper or even tagboard.  I encouraged C to glue smaller pieces on top of the first pieces to create more depth.  If she wanted a certain shape,  I was there to cut them for her.  I guess I was her assistant!?


C continued to work very diligently which made me very proud!


Here is C's finished work again!


She even inspired me to do one too!


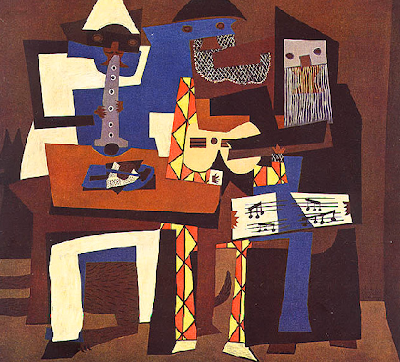
Mine reminds me of the Three Musicians painting by Pablo Picasso!!
(I think in colors mostly)


Have you made anything with Matboard Scraps?

What would you make if you had a bunch of matboard scraps?
This post is shared with:

Monday, September 26, 2011

Water Bead Fun!!!

If you have never heard of water beads... you definitely need to get on board with this sensory/play experience for your children!   They are SO COOL!  Water beads are commonly used for floral arrangements and I further discovered they are used in science experiments too!  Keep reading to find out more information on the science behind these amazing water beads and about some products that are very similar.  I happened to find some water beads at Walmart in the Floral/Candle section thanks to a very friendly worker!!  They can also be purchased at Amazon.com(for much cheaper) and many other places.  As you can see below, they grow to about the size of marbles with the addition of water.  Cassie enjoyed using them as a play environment for her plastic insects and other creatures.  Water beads inspired hours of imaginative play for C!


Here you can see how small they are to begin with....about the size of a beebee.  It was amazing how quickly the water beads grew just after a few minutes!  C enjoyed playing with the water beads when they were tiny too!  ***I reminded her that they were not edible and to never put them in her mouth!!!***  BE CAREFUL with small items like this and children!!!


Here you can see the water beads getting bigger just after an hour!  They don't look so round at first,  but eventually they take more of a sphere shape.


This picture shows how large they can get! These water beads provided such a cool sensory experience!  I would describe the feeling of them similar to grapes that are really smooth and slippery or almost like bath beads!  They took about 6 hours to grow this big....so after preschool they were ready!


C played with them for a long time....well worth the price!!! I spent $6.00 for three colors.  Make sure to buy the water beads that look separated in the package because they form separate spheres better!


C played with the water beads for the next 2 days!!!  Even a week later,  they look like they could be played with too!

The Science Behind Water Beads

I've researched further and these little playful polymers seem to also be used for Science experiments too.
I'm pretty sure this is the same polymer that is found in disposable diapers too.  Here is a some great information about Water absorbing crystals and some experiments you could do with them here.

Some information about Water Jelly Crystals....how they are saving the environment and more science activities here.

More Fun Information


Also there is a toy called Orbeez that looks to be water beads in disguise with fun scented ones and other cool products to go along with them!  There is also another similar  product called Instant Snow Polymer which is basically fake snow and you can purchase it here.

I know we'll be having more fun with Water Beads!!!
Please share your FUN and Experimentation with them!


This post is shared with:

Friday, September 23, 2011

Colorful Ivory Soap Sculpture

Have you ever tried the Ivory Soap Trick?  It is super easy and a Great Science Lesson!  We just happened to have some Ivory Soap around and I happened to come across this idea from the weekly post 10 Ways To Make Today More Magical from A Magical Childhood.  I've seen this idea many times,  but it was a great reminder to try it!  The instructions and Science behind it are found here , if you want more detail.  We did the trick a few times (It is addicting!),  but also put an Artsy twist on it!  Here is our Colorful Ivory Soap Sculpture.  Keep reading to find out how we  did this trick and how we made it  more fun!


Before the trick,  I did a little reading about the science behind this amazing experiment here and decided to incorporate a little bit of learning about what floats and what sinks and why?  We tested a bar of Dial Soap and Ivory Soap and noticed which one sank and which one floated.  I had Cassie try to guess why?
Then I explained that the Ivory soap has air in it which causes it to float and Dial soap has very little or no air.


To do the trick,  first put a unwrapped bar of Ivory soap on a paper plate or piece of paper towel.


Place the soap in your microwave for about 90 seconds and it will puff out and grow into this amazing looking foam sculpture!!!!  I didn't let C watch the whole time because of the microwaves harmful rays!  Interesting Information: My Father, who worked with radiation,  has told me the most dangerous place to stand is the side of the microwave because that is where the harmful rays leak out!  He said the front has a protective shield on it  so I just thought I would pass that along since I am mentioning the dangers of microwaves.


Now you can see how the soap puffed out!  C absolutely LOVED this!  We've done it three times and she keeps asking about doing it again! I explained to C that the reason it puffs out is because there is air inside  the soap that makes it expand when heated.....she seemed to understand!   To make our Ivory Soap Puffed Sculpture more beautiful,  I let C put drops of Liquid watercolor (you could use food coloring) on it to paint it! Be careful! because the soap is hot right out of the oven and especially in the center of the soap!


The sculpture is not at all permanent and flakes apart so it is definitely an "in the moment" activity!  C loved touching the sculpture and wanted to save pieces of it!!!


Here is a finished "Colorful Ivory Soap Sculpture" again!  Beautiful! (or Not?)  What do you think?  We put the finished sculpture back in the microwave to see what would happen and there was not much difference.  I appreciated that C wanted to keep experimenting!


I know we will be doing this "Trick" again and again!!!  C keeps eyeing our Ivory soap in the bathroom closet and I'm sure it will happen soon!  If you are wondering if you should try this....it is totally worth it!!!  Have FUN!

What have you been Experimenting with lately?

This post has been shared with: It's Playtime

Wednesday, September 21, 2011

Pipe Cleaners, Googly Eyes and Play Dough

We made these aliens/insects/creatures from colorful play dough,  pipe cleaners, and googly eyes.   We received a great fun pack of these from Craftprojectideas.com!!!  We had a lot of FUN and admired our sculptures long after they were made! By adding the pipe cleaners and googly ideas, it added a whole new dimension to our play dough! I know we will be doing this again!  Be sure to check out 34 Ways to Play With Play Dough from Hands On: As We Grow for some more wonderful ideas to bring excitement to your play dough!


What Creative Things Have You Done With Play Dough???
****************************************************************************
More Inspiration To Make Play Dough Monsters/Aliens/Creatures:

Feather and Googly Eye Monsters from The Artful Parent

Not So Scary Play Dough Monsters from Pink and Green Mama


Play Dough Monsters from Happy Home Fairy

More Play Dough Monsters from I Can Teach My Child

Even More Play Dough Monsters from Paper Crafts Connection

This post is linked to:
Monster Linkie Party, Kids Art Explorers

Monday, September 19, 2011

Recycled Styrofoam Sculptures


We had so much FUN creating these Styrofoam Sculptures!  I know that we'll make these again! (I've even saved the materials) I first saw this idea on the blog  Lilia A and I knew it would be an idea that would intrigue Cassie.  All you need are some styrofoam scraps and some toothpicks!


We used a bigger piece for the base and smaller pieces for the actual sculpture.  I used heavy duty scissors to deconstruct the styrofoam and after while we used our hands to create smaller pieces too.  C enjoyed breaking apart the pieces!!!


C and I created a variety of different styrofoam sculptures!!!  There is no paint mess,  but a lot of little white styrofoam balls were brushed off the table and vacuumed up.  C used her Toy Dyson Vacuum to help and it actually worked!!!


C noticed one of the big pieces looked like a castle, so she immediately took some figures for some imaginative play!


The great thing about this project is that it can be taken apart and built again and again!!!
C is a builder and she absolutely LOVED this! Hope you do too!

Thursday, September 15, 2011

Tie Dye Coffee Filter Fall Leaves

I'm so ready for the Fall colors.... so we decided to bring some beauty to our window a little bit earlier!!!  We created Tie Dye Coffee Filter Fall Leaves!!!   We did these leaves very much the same way as our Tie Dye Coffee Filter Easter Eggs.  All you need for this project are some coffee filters, water based markers in Fall colors (the ones that work the best are: Mr. Sketch Markers ), scissors, newspaper, water, and Metallic Markers.


First, create a simple leaf shape on your coffee filter.  To create variety,  I created some different sizes of leaves too.  Cut out the leaf and place it on layers of newspaper so the markers or water won't soak through to your table!


Now color the leaf shape with water based Fall color markers like brown , red, orange,  and yellow.  We made patches of colors rather than just one color.  You can leave a little white showing.


Here is an example of one leaf that C did.  Some were colored with smaller patches of color too.


After coloring,  make sure the leaf is placed on the layers of newspaper and spray with a mist over the leaf to make the colors run.  Don't put too much water or the colors will fade away too much! (C loves this process!)

After done spraying,  let the leaves dry for a few hours.  We let them dry over night.  


After the leaves were dry,  we used metallic markers to add veins to our leaves. Adding the veins gave the leaves  a finishing touch that they needed!


Here are our leaves again.  They make great sun catchers too! 


Happy Fall!


This post is shared with: It's Playtime, The Play Academy, Come Together Fall Fun,             Thanksgiving Link-up

Wednesday, September 14, 2011

Wooden Skill Stick Sculptures

We dug into our free supplies from Craftsprojectideas.com (thank you again!) and decided to work with the Wooden Skill Sticks.  As you can see,  they are basically craft sticks with little notches in them.  Dad helped to build the little house in the upper right corner,  but Cassie started with the base of a  house and ended up more with a sculpture which I love!  She became frustrated  because it was difficult to built something so exact so she went in another direction which in my book is fine!  I think these sticks are great and as C's fine motor skills get better she'll be able to build a more exact house structure.The nice thing about these Wooden Skill sticks is that you can either build and take them apart or you can glue them to make more permanent structures.  We chose to take them apart and rebuild another day!


C beginning to build her house base,


C took this very seriously and wanted to keep making these sculptures!  She is definitely a builder and loves her legos, blocks,  magna tiles, and any other building toy.


Basically C would make a smaller sculpture and place it on top of another to create a larger sculpture!  You could only build so high  when your building in different directions.


A finished sculpture!


Since these creations have been taken apart,  I know we will be creating more with these wooden skill sticks.  C has even asked about building with them again and she wants to glue them too!

Have your children ever built with wooden skill sticks?

What have you made with them?

***If your children like building activities Craftsprojectideas.com has a great selection of Wooden Supplies such as mini craft sticks, skinny sticks,  colored craft sticks, and round dowels.  You can find their page of wooden supplies here.  Cassie would love all of them! 

Monday, September 12, 2011

Finger Painting On Foil

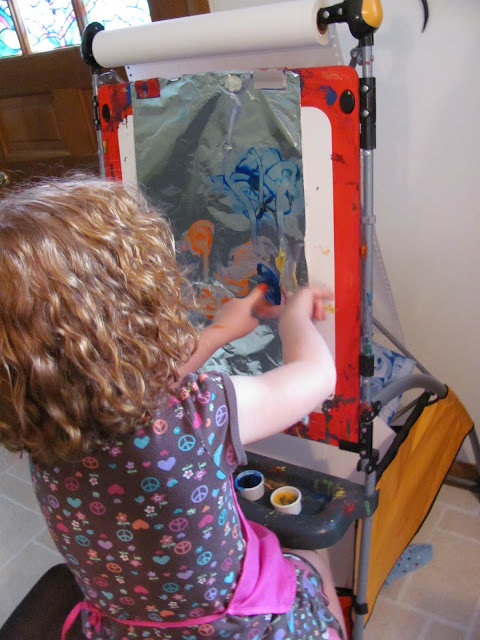
We received this really awesome box of craft supplies from Craftsprojectsideas.com and one of the items that they included was finger paint (along with lots of other goodies!!!)!! Thanks Craftsprojectideas.com for being so Generous!!!  Be sure to check out their site with all kinds of craft supplies and ideas! I was a little apprehensive to use finger paint, since Cassie hasn't been a big fan of it in the past,  but this time she really enjoyed it! (Hooray....progress!)  I saw a post on Picklebums about Painting on Foil here and thought that we could finger paint on foil too!  So you can check out the fun C had.....she didn't want to stop until the colors were a muddy purple! Here is C using just her fingers....


Now C is using her hands...!!!!


Here she is really having fun!!! She enjoyed the shiny foil surface. It looks really cool too!  It will flake off when you let it dry. To prevent this... put a few drops of dish soap in the paint and it will help the paint adhere to the foil better!!! 


Finger Painting was a Success....for a girl who never wanted to get paint on her hands!!!
Here is the supply box Craftsprojectideas.com sent:


We look forward to creating with more of the supplies that were sent to us!!!! 

Do you have any suggestions of what we could make with the other supplies pictured in the box???
(Let us know in the comment section below!!!)


This post is shared with: No Time For Flashcards

Sunday, September 11, 2011

Our Visit to The Cleveland Art Museum

We had a wonderful visit to The Cleveland Art Museum the other day!!!  I can't believe this was the first time I had ever taken Cassie! Most people would think an Art Museum might be a boring for a young child, but I remember reading about a post from another blog about making your trip like an adventure... and I knew this would help to keep C's interest: Making a Scavenger Hunt!  I created a "Visual Scavenger Hunt List" like the one I saw at Montessori MOMents.  What a fab idea from Lori at Montessori MOMents....be sure to check out her post on this here! To create a "Visual Scavenger Hunt",  I went to the Cleveland Museum of Art's Website and selected about 20 art works to print on a single sheet of paper.  Then, we were off to the museum!!! Cassie stated to me that "We're on Treasure Hunt!!!" This made it SOOO EXCITING!  She couldn't wait!!!  Here is Cassie finding the Armor Court and Knight! She couldn't understand why the horses had armor too!?!


Here is our "Visual Scavenger Hunt" for The Cleveland Museum of Art:


C with a Greek Sculpture (I think!).


C very intrigued with this Mummy Case!


C finding The African Serpent Headdress on her "Visual Scavenger Hunt List".


Cassie posing in front of a sculpture by Artist Red Grooms!!! I've always loved this!!!


I wish I had taken more pictures,  but we were so engrossed with searching for all our treasures!!!  Cassie did a fabulous job searching for the different items on her list and even saw some before I even did!  We went at a fairly fast pace through the museum because we were looking and I didn't want to stop for too long!  I asked her what her favorite piece of art was in the Museum and she said:
EVERYTHING!
(So,  I think it was a successful visit!!!)

What are your experiences with visiting an Art Museum with children???
(please share!!!)