Tuesday, November 29, 2011

Giveaway for Make and Takes for Kids Book

   
A couple weeks ago I did a review (check it out here!) of this wonderful book: Make and Takes For Kids: 50 crafts throughout the year  by Marie Lebaron of Make and Takes blog.  Now I'm excited to provide a GIVEAWAY of the book to one lucky reader!!! If you Love her blog,  you'll Love the book too! If you have never checked out her blog,  check it out here and you will be pleasantly surprised with her endless collection of ideas! This book is short and concise with cute crafts organized by month using simple materials.  It is a very attractive colorful book with great pictures and instructions too.  It would make a great gift for parents, teachers, grandparents, and caregivers! (I Love it too!) Details about entering the GIVEAWAY are at the end of this post!!!!


Cassie really enjoyed looking at the 50 colorfully photographed crafts included in this book!!!  She wanted to create all the projects!  We created some of her FAVORITES below! (our versions)


BEADED HEART FLOWERS (in February)


APPLE STAMPED FLOWERS (in September)


COFFEE FILTER UMBRELLAS (in April)


  FOAM HEART BRACELETS (in February)


One of my Absolute FAVORITES I want to try: 
SUNFLOWER LOLLIPOP COOKIES (in August)


This is a great book that will help you to create wonderful memories with children while learning and having fun! It would make a great Holiday gift too!!!

The publisher of this book: Wiley, has a great crafts page too:

Now for your chance to win this lovely book!!!
***
To enter:

Make a comment below telling me your favorite arts and craft supply.

You may enter once daily and each Facebook post, blog post, or Tweet that links back to this giveaway will give you another chance to win!!!

Deadline:  December 6, 2011

GOOD LUCK!!!

Monday, November 28, 2011

Paper Candy Canes

I've made these before with my Elementary Art students and they absolutely LOVED these Paper Candy Canes!  It was a great project to do before the holidays and the fact you could make them so simply made it a real hit. I decided to try it with C too.  She LOVED it too. It occupied her for a good hour or so.  Keep reading to find out how to make these.  SO EASY and with simple materials that I'm sure you have at home.


All you need for this project is:
White copy paper (or any kind will work)
red and green markers/crayons (or other colors)
transparent tape
a pencil

To Create Paper Candy Canes:
First,  design a white paper of any size with markers/crayons with two to three lines along the edge of the paper.  You can use a ruler if you want the lines straighter. I think using a ruler for C would have just frustrated her,  but older children may appreciate a ruler.


Turn your paper to the back side and then roll the paper from corner to corner so the drawn lines start to wrap diagonally to look like a candy cane.


Use transparent tape to hold the peppermint roll together at the other end.


After that,  take a pencil and curl the top to look like a hook.


Now you have a paper candy cane.  We made many!


We made a lot....big, medium, and small sized candy canes...  They could be hung on your Christmas tree like ornaments or even as a garland if they were attached to a ribbon.


I'm excited to share more Christmas posts with you in the coming weeks...

Tuesday, November 22, 2011

Quick Turkey Art For Your Thanksgiving Table

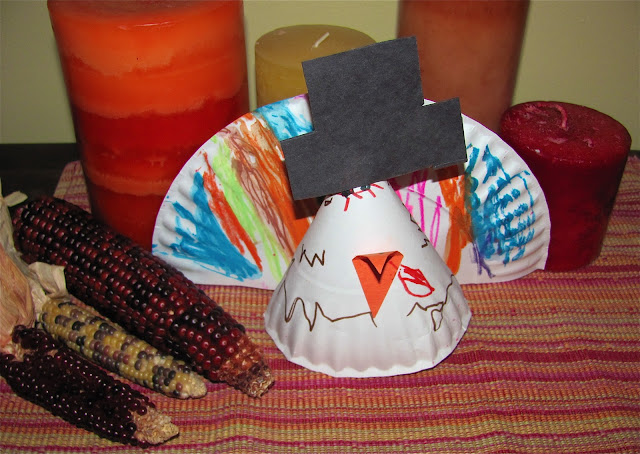
This is just a quick post that you might even be able to do on Thanksgiving,  especially if you are using paper plates and have some markers and crayons on hand! Here are our Cute turkeys that you can even set out on your Thanksgiving Table:


Here is how to make them.  First,  cut a paper plate in half.


Decorate one half with colorful feathers and the other half brown (or another color) for the head I added eyes,  but you could wait for that part until the head is formed in the next step.


Next staple the head piece into a cone like this and add eyes.


Add a construction paper beak, wattle, and pilgrim hat.  Staple on the feather part to the head and then you have a nice addition to your Thanksgiving display or dinner table!  Here is mine.


Here is C's turkey!


So simple and cute!  

Happy Thanksgiving to all my readers!

I am thankful to be able to provide creative inspiration to you each week!

Enjoy your families and give thanks for the simplest things!!!
*****
What simple things are you thankful for?


Native American Concho Belts

We are on a kick of making wearable art lately.  We made crowns,  Native American Feather Headbands, and now Native American Concho belts.  The fascinating thing about these belts is that the metal discs, which are called conchos, were originally hammered from real silver dollars!!!  You learn something every day!  These conchos not only were part of belts,  but also were used as a decoration on clothing and for hair decoration! We used simple materials to create our own concho belts: craft foam, permanent markers, and ribbon... or you could use yarn too.  Here is beautiful concho belt  from Sedonaindianjewelry.com.  Check out some beautiful Native American Concho Belts by checking out my Google image search for them here.


Here you can see one of C's Native American Headbands while she is designing her craft foam conchos for her belt.  You could pre-cut the foam shapes or have children cut their own shapes.  I wanted the focus to be on designing the conchos, so I pre-cut them and punched the holes on the sides.  If you don't have craft foam, you could use construction paper too.  I had C look at a paper with Native American Designs found here for ideas,  but she also chose some of her own too.  We used permanent markers on the craft foam so the image wouldn't rub off.


After the designs were finished,  C strung them on some thin ribbon.  It was good practice sewing to get the conchos going all the right way.  Definitely a good skill to practice fine motor skills!  Here is C's finished concho belt....ready to wear!  When I did this with my elementary art students they couldn't wait to wear them....C didn't want to wear hers.  Go figure!!!  Either way it turned out cute and it inspired her to create more concho belts!


Here is my finished concho belt!


I absolutely LOVE Native American Art!!!

What Native American Art Inspires you?

I love Dream Catchers, Totem Poles, Pouches, Beadwork, Pottery, and more.....(I could go on!)

Sunday, November 20, 2011

Construction Paper Strip Sculpture

We made sculptures using construction paper and glue.  These sculptures are super FUN and I guarantee that all kids will LOVE this!!!  As an art teacher, I would do this project with all levels.  It can turn out very abstract and then some kids will have a vision of what they want to create too!  Here is C's masterpiece!  She said her sculpture was a Roller Coaster Playground!


All you need for this project is some construction paper cut into strips,  glue,  and a full sheet of paper to build on.


Before starting it is a good idea to show some ways you can fold paper to create different shapes and lines. Also, make sure to talk a little about building and the idea of building supports and not to make it too top heavy.  I showed Cassie how to create an accordion (fan) fold, spirals, circles, squares, and to make sure to bend tabs on the ends of the papers.  Kids will come up with their own ideas too!


C loved this!  She is definitely a builder! Some kids may need a little more help,  and others will work very independently with this project.  I talked to C about putting dots of glue and holding for 10 seconds (counting to 10 to herself).  I showed her if you hold it for less the papers may not hold together.


Here it is really taking shape.  C chose to build a lower structure,  but this project can get pretty tall  if  a child chooses to build more vertically.


Here is C's finished sculpture again! I love the torn pieces added to the base of the sculpture.  Very proud!


Here is just the beginning of my sculpture!


We used Tru-Ray Sulphite Construction Paper, which is my absolute Favorite because it  has such bright colors, doesn't fade as fast, and doesn't tear as easily.  It can be frustrating using the cheaper brands of construction paper!  It is usually more expensive, but through Amazon.com it is only $1.75 for 50 sheets!

Happy Paper Sculpting!!!

Wednesday, November 16, 2011

Crowns, Crowns, and more Crowns!!!

C has become obsessed with creating crowns lately! This is just a sampling!  All kids love making hats and wearable art!!!  As an Elementary Art Teacher,  I saw first hand that many of the "wearable art projects" were some of my students favorites!  There is something MAGICAL about being able to wear something you made rather than just put it in your book bag to go home! 


To create the crowns,  we first created a big zig zaggy line across the paper to create 2 pieces from a 9x12 piece of construction paper.  You could also put two pieces together or fold the paper in half to create more equal sized crown pieces.


For my head I needed 3 crown pieces,  but for most children you would just need 2 pieces to make it long enough.  If you used a 12x18 paper you might just need one piece depending on the size of the child's head.


After you have the crown pieces cut out,  you can either staple or glue the pieces together to form a crown.  C preferred stapling, of course!  Kids love tools.....especially staplers.  We love our Swingline Red Stapler! (like the one from the movie Office Space!!!)


After stapling,  you can design your crown any way you like. C used crumpled tissue paper here. Some suggestions are: markers, crayons, buttons,  pom poms, and glitter!


One HAPPY Queen!
(she told me that she was the Queen,  not a princess!)


What wearable art have you made with your children?

Other Wearable art we have made:

(Dr. Seuss inspired)
(with paper tubes)

Monday, November 14, 2011

Coffee Filter Turkey Cards

This past weekend we made Thanksgiving cards with coffee filters, watercolor paints, and paper! I love using coffee filters for art because they are cheap and accessible!  We had quite an assembly line going and created over 20 or so cards!!! WOW!  C enjoyed making these turkey cards quite a bit!  We were inspired by Dilly Dali Art and their Spin Art Turkeys! They made Turkey Table Toppers.  Here is one of our finished cards.


First we painted coffee filters with watercolor paints.  Make sure to have newspaper underneath because they will soak through.


When the coffee filters are dry, cut them all in half like this.


Then glue the half of the coffee filter on a folded card or any paper if you don't want it to be a card.


Tear a piece of brown tissue paper (or construction paper) for the head.  We used two paper punch holes for the eyes and added black dots. You could use googly eyes too.


Now add a red piece of tissue paper for the wattle and a yellow triangle (and nostril holes) for the beak.


Finally, add lines for feathers and crumple brown tissue paper for the wings.  You could use real feathers too.  We drew the legs on and added grass for a background.  Simple and sweet! Very cute!


More cuteness!


They are adorable! Aren't they?  Don't you wish that you were receiving one?


Happy Thanksgiving!!!

This post is linked to: It's Playtime, Tip Toe Thru Tuesday, Thanksgiving Link-up

Sunday, November 13, 2011

Make and Takes Book Review!!!

Exciting News! There is a new kid's craft book on the market!  Marie LeBaron from Make and Takes blog has a wonderful new book: Make and Takes For Kids: 50 crafts throughout the year that you have got to take a gander at!!!  If you Love her blog,  you'll Love the book too!  If you love having a short concise book with crafts organized by month this is the book for you.  It is a very attractive colorful book with great pictures and instructions.

First hand, I know it is appealing to kids because my daughter Cassie had a wonderful time reviewing the book and told me already the things she would like to make! (She said she liked EVERYTHING!)


 Look at her excitement and focus! 


Here are some of the ideas we have tried from the book:

APPLE STAMP PAPER BOUQUET

WATERCOLOR COFFEE FILTER UMBRELLA

BEADED PIPE CLEANER FLOWERS

FOAM HEART FRIENDSHIP BRACELET

And so many more ideas to try....

I am an arts and crafts book connosieur and I know Make and Takes for Kids  would make a great gift for teachers, parents, and grandparents.  If you are looking to spend quality time with children this book will help you do that! You can purchase Make and Takes for Kids at Barnes and Noble,  Amazon.com, Walmart.com , and Wiley.com
The publisher of this book: Wiley, has a great crafts page too: