Showing posts with label experimenting. Show all posts

Friday, July 5, 2013

Making and Playing With Slime

I cannot believe we never tried this until now.....so worth the wait though. Find out how we created this slimey Fun. The pictures speak for themselves.
Pin It
To create stretchy and oozing slime all you need is:
Slime
(2 Recipes for Slime found here in my last post)
a strainer, colander, sieve, or anything with holes in it (we used a tennis racket!)

Basically all you do to create this AWESOME experiment is to place the slime on top of the item with holes and let it slowly ooze out.  You could hang a strainer up high or we placed a tennis racket on top of two kid stools on either side. Then let the slime do its trick.  I walked away for a minute or two and my daughter came yelling, "Come quick.....NOW!" This was ultimate excitement!
Looks like a brain.
SO Slimy and FUN.....

Hope you try this....do not wait as long as we did!

Wednesday, May 2, 2012

32 Ways To Play With Water Beads

There are so many ways that you can play and explore with Water Beads!  I collected 32 ideas, but there are so many more if you keep searching. Water Beads are definitely a sensory experience, but I wanted to group the play activities into "6 categories of ideas" that seemed to be the most popular: (1)Exploring With Light, (2)Creative Sensory Bins, (3)Painting, (4)Shaving Cream, (5)Science, and (6)Plastic Eggs.  So here are all 32 Ideas. Have Fun!


Exploring Water Beads and Light


Water Bead Exploration 0n a Light Table (photo above) TinkerLab


Glowing Water Beads Growing A Jeweled Rose

Water Beads in the Dark Preschool Projects


************
Creative Sensory Bins with Water Beads


Water Bead Seaside Sensory Tub (photo above) The Imagination Tree


Monster Sensory Tub I Can Teach My Child

Hidden Diamonds Sensory Bin  Play Create Explore


Bubblegum Scented Water Bead Play Cachey Mama's Classroom

Water Beads and Slime The Chocolate Muffin Tree


************
Painting With Water Beads


Water Bead Painting (photo above) Growing A Jeweled Rose

No Mess  Finger Painting with Water Beads Our Feminist {Play School}


************
Water Beads and Shaving Cream


Water Beads and Shaving Cream (photo above) Dirt and Boogers

Water Beads ~ and Shaving Cream 3G=Growing Godly Girlz

************
Water Bead Science

Water Bead Science NurtureStore


Dehydration of Water Beads Fit Kids Clubhouse

Preschool Science: Water Beads Raising Lifelong Learners

Water Bead Goop A Little Learning For Two


************
Water Beads and Plastic Eggs


Water Bead Eggs (photo above) Modern Parents Messy Kids


Easter Egg Water Bead Discovery Dabbler Mom


Do You Have More Ideas to Share?

Here are some more:

Frozen Water Beads


This post is shared with: It's PlaytimeFit Kids Clubhouse


Thursday, January 5, 2012

An Experiment in Making Snow!

I often think about my readers that don't get snow,  so I thought they would appreciate a post on making snow!  We haven't really gotten much snow here in NE Ohio until recently and I can't imagine never really experiencing snow.  We had fun comparing our real snow to our homemade snow.  To create some snow all you need is a blender and some ice cubes!


First, pop about 16 ice cubes in your blender.


Then blend until you have ice that has turned to snow.  Make sure your blender is strong enough to grind ice! Here is our Instant SNOW!!!


C was AMAZED that we made snow!  We ran outside and grabbed some REAL snow and I told her to make some observations.  Can you guess which one is the real snow????  Pretty convincing???


C noticed the REAL SNOW was colder,  softer, and didn't taste as good!!!


C observed the HOMEMADE SNOW was warmer,  harder, and tasted better!!!  Both snows could form into snowballs when warmer.  Both melted....the homemade snow melted faster!


C had a great time with this experiment and I'm sure she will ask to do it again!!!

Check out this link from Weather Wiz Kids to find out all kinds of FACTS about SNOW,  like How is Snow Formed,  How do Blizzards Form, What are Snowflakes, Why is Snow white,  and more.....

If you don't want your snow to melt try some Insta-Snow and you just add water!

Also, check out this GREAT post At TinkerLab:  Making Fake Snow for some tips about Insta-Snow!!  

Which Snow do you think is the REAL SNOW in the photo with the two bowls of SNOW??? (the left or right bowl)

This post is shared with: It's Playtime, The Play Acdaemy, Link and Learn

Friday, November 11, 2011

Baking Soda and Vinegar Fun!

We did this quite some time ago and now I finally had inspiration to post!  Hands on as we grow and  The Imagination Tree are having a 30 days to Hands on Play Challenge and Day 10 happens to be Mixing Concoctions.  This post goes perfectly with their challenge!  I hope all of you have tried mixing together baking soda and vinegar with your children!  It is such a Fabulous experience and I don't think anyone tires of this!  Please try it if you never have!  We did a little of this on our Pretend Potions post too!


First we put a bunch of baking soda in a pan and used an eyedropper to place vinegar and food color to see what happened.


A little bubbling.  Beautiful....creating little craters.


Then the biggest impact was putting the baking soda into the colored vinegar! This is always the most exciting part of this activity!


We tried to get all of them bubbling at the same time!


This led to at least an hour of FUN! Really!?  Inexpensive FUN and mostly everyone has these ingredients in their pantry!


We will be doing this again....because we've done it so many more times before!!!

Be sure to join in on 30 days to Hands on Play!!!
Check out other great ideas to get you playing with your kids!
The play goes till the end of November!


Sunday, November 6, 2011

Painting In Bottles

I saw this irresistible idea for painting inside bottles at Irresistible Ideas For Play Based Learning and knew we had to try it!!!! When I told C about the idea she instantly wanted to participate in this endeavor! Again, it was irresistible!  Here are our bottles soon after we painted the insides of our bottles.  I think it was a lot of fun and a completely new experience!


First, we poured paint into bottles and experimented with different amounts of paint for each bottle we used.  C really enjoyed pouring the paint into the bottles.


Then, we shook, shook, shook the bottle.  C completely LOVED this part!  Good for a child that doesn't like to sit too long!  This activity would make a GREAT color mixing activity too!


We tried glow in the dark paint in one bottle.  The colors looked cool at first, but the mixing of glow in the dark paint wasn't very pretty.  We tried looking at this bottle in a dark room,  but it didn't seem to glow? Hmmm.... don't know why?


C seemed to like the side to side motion of shaking the bottle the most.  She liked to watch the paint slowly drip down after most of the paint was thinned out.


I wish that we had more bottles to experiment with because it would be really neat to see the effect of using different sizes of bottles. You can see all the color mixing that occurred inside the bottles.  Pretty cool,  huh?  Unfortunately the colors didn't really stay as vibrant because most of the paint ran off after a day,  but either way it was a worthwhile activity.  Remember it is the process that truly matters and this is definitely one of those instances!!!


Maybe next time we will paint on the outside of bottles! Stay tuned.

What painting methods have you been experimenting with???

Friday, September 23, 2011

Colorful Ivory Soap Sculpture

Have you ever tried the Ivory Soap Trick?  It is super easy and a Great Science Lesson!  We just happened to have some Ivory Soap around and I happened to come across this idea from the weekly post 10 Ways To Make Today More Magical from A Magical Childhood.  I've seen this idea many times,  but it was a great reminder to try it!  The instructions and Science behind it are found here , if you want more detail.  We did the trick a few times (It is addicting!),  but also put an Artsy twist on it!  Here is our Colorful Ivory Soap Sculpture.  Keep reading to find out how we  did this trick and how we made it  more fun!


Before the trick,  I did a little reading about the science behind this amazing experiment here and decided to incorporate a little bit of learning about what floats and what sinks and why?  We tested a bar of Dial Soap and Ivory Soap and noticed which one sank and which one floated.  I had Cassie try to guess why?
Then I explained that the Ivory soap has air in it which causes it to float and Dial soap has very little or no air.


To do the trick,  first put a unwrapped bar of Ivory soap on a paper plate or piece of paper towel.


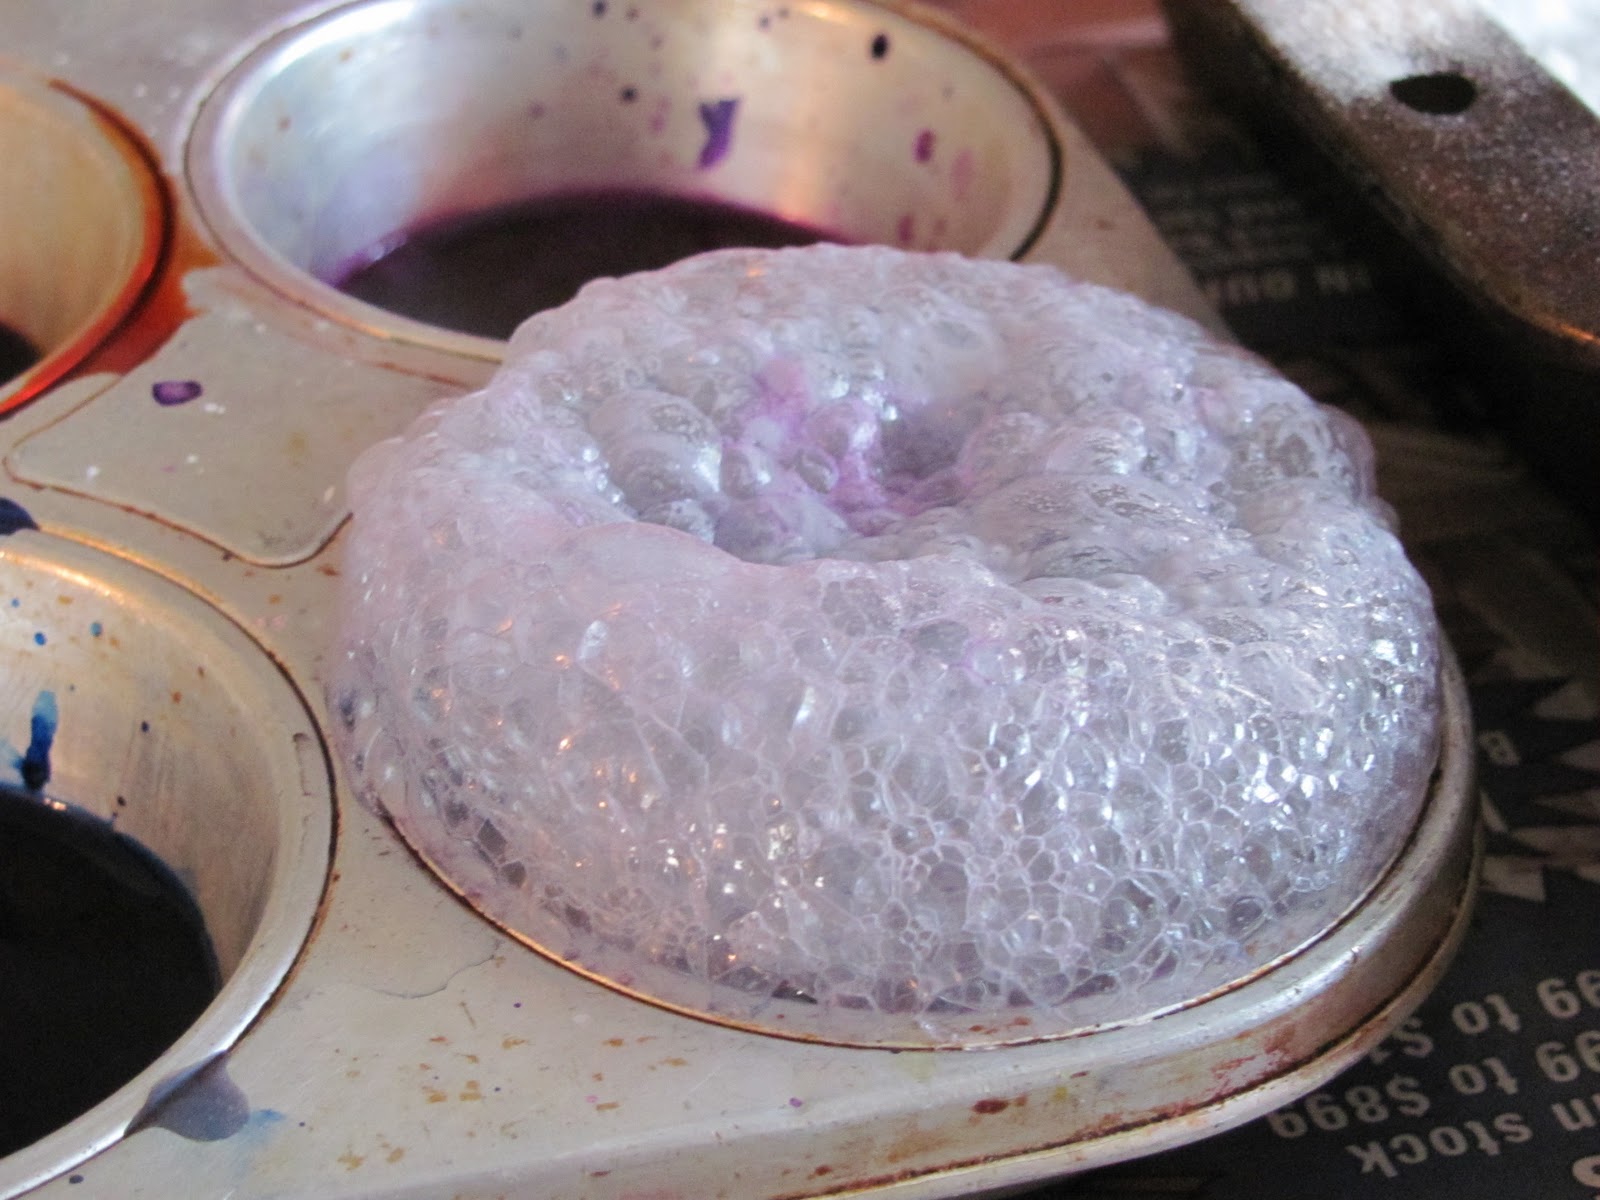
Place the soap in your microwave for about 90 seconds and it will puff out and grow into this amazing looking foam sculpture!!!!  I didn't let C watch the whole time because of the microwaves harmful rays!  Interesting Information: My Father, who worked with radiation,  has told me the most dangerous place to stand is the side of the microwave because that is where the harmful rays leak out!  He said the front has a protective shield on it  so I just thought I would pass that along since I am mentioning the dangers of microwaves.


Now you can see how the soap puffed out!  C absolutely LOVED this!  We've done it three times and she keeps asking about doing it again! I explained to C that the reason it puffs out is because there is air inside  the soap that makes it expand when heated.....she seemed to understand!   To make our Ivory Soap Puffed Sculpture more beautiful,  I let C put drops of Liquid watercolor (you could use food coloring) on it to paint it! Be careful! because the soap is hot right out of the oven and especially in the center of the soap!


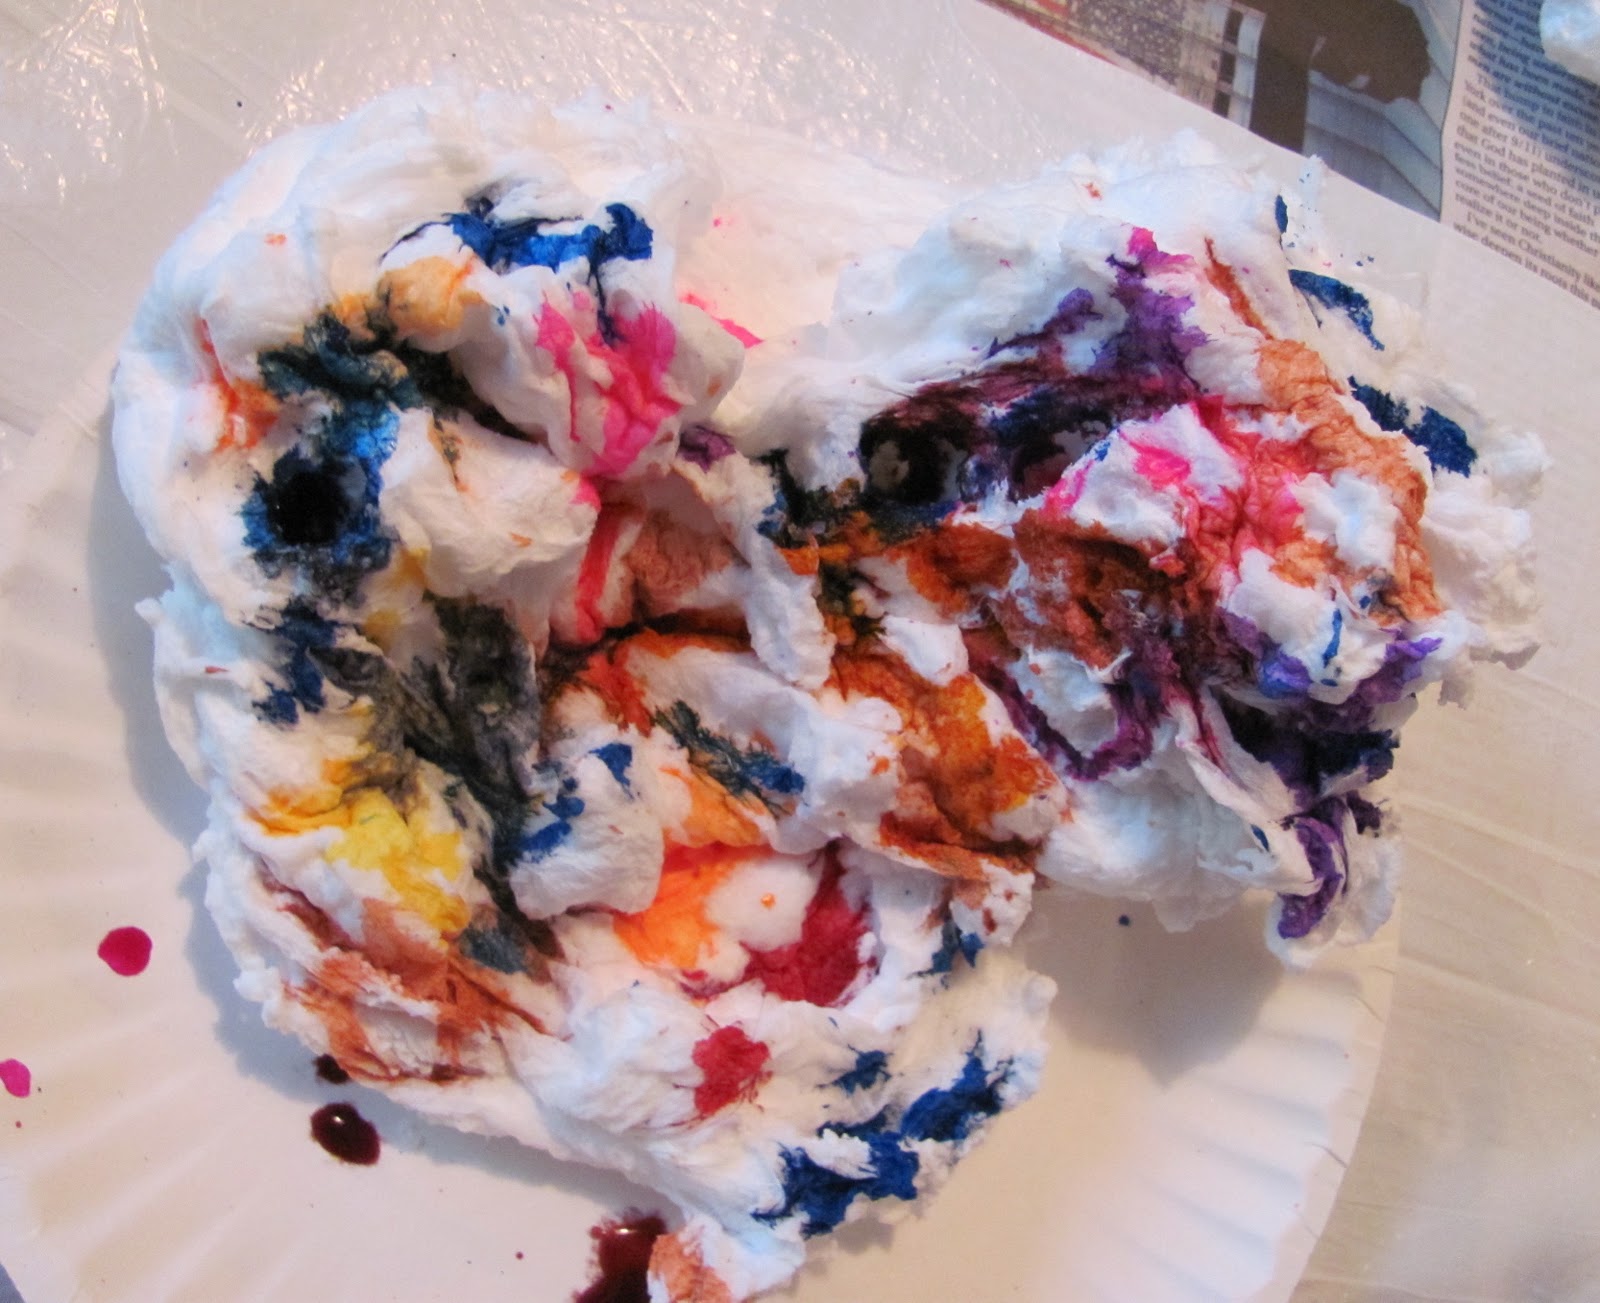
The sculpture is not at all permanent and flakes apart so it is definitely an "in the moment" activity!  C loved touching the sculpture and wanted to save pieces of it!!!


Here is a finished "Colorful Ivory Soap Sculpture" again!  Beautiful! (or Not?)  What do you think?  We put the finished sculpture back in the microwave to see what would happen and there was not much difference.  I appreciated that C wanted to keep experimenting!


I know we will be doing this "Trick" again and again!!!  C keeps eyeing our Ivory soap in the bathroom closet and I'm sure it will happen soon!  If you are wondering if you should try this....it is totally worth it!!!  Have FUN!

What have you been Experimenting with lately?

This post has been shared with: It's Playtime

Friday, August 19, 2011

Pretend Potions!

This idea came over from Frugal Family Fun Blog!  Check out their post here. When I saw this idea I knew Cassie would love it!  All you need are some recycled plastic bottles, water, food coloring, dish soap, and whatever else you choose (we even added baking soda and vinegar!) You could add funnels too....we did it so spontaneous we forgot!  Now your ready for some Pretend Potions!


Adding some drops of food coloring to the water!


Adding some baking soda to the vinegar to make it bubble!


Watching the experimentation!


Mixing colors...and adding dish soap for bubbles...


We had Fun! Thanks to: Frugal Family Fun Blog!

Thursday, August 4, 2011

Queen Anne's Lace Garden

Tis the season here for Queen Anne's Lace! Most people view this as a weed in their garden....but these lovelies have become one of our flower gardens!  Yes, we don't keep the most manicured lawn or gardens, but my 5 year old loves it! She has been picking Queen Annes for the past couple weeks and we have an ample supply as you can see! This picking resulted in doing the age old experiment with food coloring!  For now here are some endearing pictures of C with these flowers or weeds???


Picking and smelling them!


Bringing her beautiful bouquet to Mom!


We used red, blue, yellow, and green food coloring and water in little bottles Then we put the flowers in the bottles and waited for them to drink the liquid.  C was drinking some juice here and I told her she was drinking just like the flowers would be doing! I don't think her face would turn purple, but then I have heard of people turning orange from drinking too much carrot juice....so who knows?


It didn't take long for the flowers to change colors. The longer you leave them the darker they get! For some reason the red food coloring did not work? I kept putting more food coloring or less of it and nothing seemed to make a difference.  They just wilted over! Has anyone else had this problem with red food coloring?


I'm always amazed with this experiment! I have always been fascinated with Queen Anne's Lace Flowers and loved looking at the little white flowers with the little violet one in the center.  I think there is a story about the violet flower, but I can't remember! (Found it!) Here is a link to the story of Queen Anne's Lace here.


What other flowers have you tried for this experiment?

Tuesday, May 10, 2011

Inventive Straw Painting

After a session with Bubble Printing, (my last post) Cassie came up with her own method of painting: Straw Painting!! She was so proud of herself for inventing this that I had to share! She kept telling me, "I created a new way to paint!"I like the fact she took ownership of this method of painting. Here is one of our straw paintings we did by blowing the paint soon after her method:


To create Cassie's Straw Painting you need to take the leftover bubble mixture from Bubble Printing and a straw and jump right in! The straw is your paintbrush.


Here is Cassie painting.  It is nice watery paint and some of it gets trapped in the straw so it makes it kind of like a drip painting too!


Here she is painting...


and with her Masterpiece!!!!


To create the Painting that we blew the paint, we just spooned some of the same paint on some paper like this. You could add more or less as you go along.


Next take the straw and blow the paint around.  The paint should be liquid enough to do this. It also helps to turn the paper around as you go along.


A little to tricky to blow around, but fun once you get the hang of it!


It was fun to see the colors mix together, especially since we had red, yellow, and blue paint (primary colors!) It was also neat to imagine things in the paintings!!!!


WHAT DO YOU THINK?

DO YOU LET YOUR CHILDREN EXPERIMENT TO CREATE THEIR OWN IDEAS?

I think she might of even enjoyed this more than Bubble Printing!!!
This Post is Linked to:
PreK + K Sharing