Showing posts with label recycled art. Show all posts

Monday, May 6, 2013

Recycled Junk Robots

Some of my favorite projects are done with recycled junk and this is a new one to add to the list. The idea comes from my daughter's kindergarten teacher. We've been making recycled robots at home too and I wanted to share how to make them.
Pin It

Materials Needed:
recycled boxes (we mostly used food boxes)
recycled Lids and bottle caps for eyes and buttons
Cardboard tubes
glue or glue gun
aluminum foil
silvery pipe cleaners
anything else you choose

To create a robot, we first gathered some food boxes, cardboard tubes, bottle caps, and lids. We built the robot without gluing to see how it would look.

Next, we covered the boxes and cardboard tubes with aluminum foil to give the robot a cool metal look. We used a glue gun for fast dry time.

Then we glued the pieces and parts together. 

Lastly, we added more bottle caps for decoration and buttons.  For a finishing touch we added silver pipe cleaners and a foil tail to make a Robot Monkey.

This one is a Robot Doggie.

We'll be making more Robot Creatures soon! Such a fun project.


We made these Tin Can Magnetic Robots a couple years ago.  Find out how to make them here.

Wednesday, January 23, 2013

Wood Scrap Collage

This is a continuation of our Wood Scrap Sculpture post. We had so much fun making our sculptures so we decided to just paint flat wood scraps and practice mixing colors on each wooden shape. Each individual scrap turned out beautiful, but when you put them all together they made some amazing Wood Scrap Collages.

Pin It

Materials Needed for Wood Scrap Collage:
Wood Scraps
Paint
paint brushes
Glue
Cardboard base

First gather some wood scraps. I've gotten wood scraps from craft stores, home stores, and the Wood Shop Teacher at the High School that I work at too. 


Then we just started painting and mixing colors on the flat pieces of wood. This was a lot of fun and many of these could even stand on their own as beautiful miniature paintings.

Then we started arranging them in different ways to create collages.  

Another way....overlapping.

This was a great activity....painting the scraps, arranging them, and just simply playing/building with them. You can glue them in the end or just leave them as is to arrange and rearrange. Hope we have inspired you to create some colorful scrap wood paintings or collages.

Saturday, November 3, 2012

How to Make a Simple Kazoo

I love simple and easy projects made with recycled materials and here is one of them.  We made Kazoos. Find out how below.


All you need to create a simple kazoo is:

A cardboard tube
a small square of wax paper
rubber bands (or elastics)
paint or markers for decorating


First we painted and decorated our cardboard tubes and let them dry.


Next,  put a square of wax paper  over one end and attach it with a rubber band.


Then, hum or sing through the other end! So easy...and fun...


What musical instruments have you made with your kids?


Pin It

Friday, January 6, 2012

Snowflakes From Recycled Water Bottles

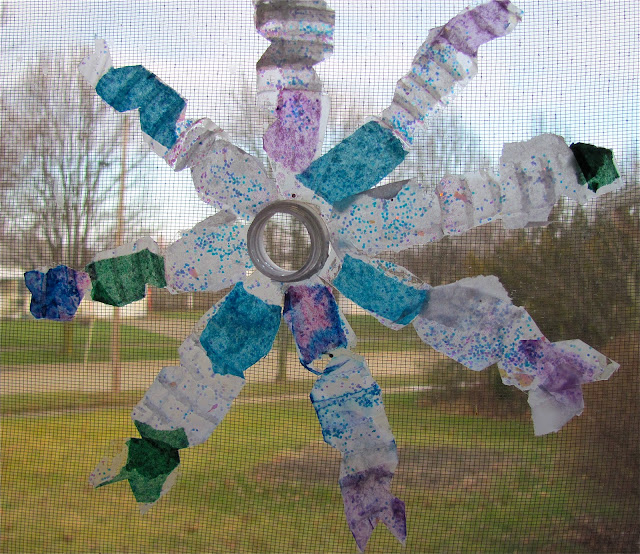
Today I'm guest posting over at The Artful Parent!!! I'm truly honored to be on Jean's blog since her blog is one of the main reasons I started The Chocolate Muffin Tree.  I started following The Artful Parent in 2009 after seeing it recommended in Parent Magazine.  I hope you can pop on over to find out how we made these Snowflakes From Recycled Water Bottles here.  We had a lot of FUN and they turned out GORGEOUS!
Thanks to The Artful Parent for her continued inspiration...hope you enjoy the post!!!


Sunday, November 6, 2011

Painting In Bottles

I saw this irresistible idea for painting inside bottles at Irresistible Ideas For Play Based Learning and knew we had to try it!!!! When I told C about the idea she instantly wanted to participate in this endeavor! Again, it was irresistible!  Here are our bottles soon after we painted the insides of our bottles.  I think it was a lot of fun and a completely new experience!


First, we poured paint into bottles and experimented with different amounts of paint for each bottle we used.  C really enjoyed pouring the paint into the bottles.


Then, we shook, shook, shook the bottle.  C completely LOVED this part!  Good for a child that doesn't like to sit too long!  This activity would make a GREAT color mixing activity too!


We tried glow in the dark paint in one bottle.  The colors looked cool at first, but the mixing of glow in the dark paint wasn't very pretty.  We tried looking at this bottle in a dark room,  but it didn't seem to glow? Hmmm.... don't know why?


C seemed to like the side to side motion of shaking the bottle the most.  She liked to watch the paint slowly drip down after most of the paint was thinned out.


I wish that we had more bottles to experiment with because it would be really neat to see the effect of using different sizes of bottles. You can see all the color mixing that occurred inside the bottles.  Pretty cool,  huh?  Unfortunately the colors didn't really stay as vibrant because most of the paint ran off after a day,  but either way it was a worthwhile activity.  Remember it is the process that truly matters and this is definitely one of those instances!!!


Maybe next time we will paint on the outside of bottles! Stay tuned.

What painting methods have you been experimenting with???

Wednesday, September 28, 2011

Matboard Collage

We made Matboard Collages! You can easily get scraps of this wonderful material at your local framing shop! It is usually absolutely free because there are always scraps left over from making mats for frames.  We've used matboard for backgrounds of many projects or whenever we have needed stiff cardboard. Here is one of Cassies' creations titled: Person, House, and Building:


To begin this project,  I pre-cut a bunch of geometric shapes and strips since matboard is rather difficult to cut for a 5 year old!   Matboard is satisfying to work with because of all the fun colors and textures ----some were even metallic and marbled!!!  You never know what you might get when you pick up scraps at the frame shop!


We used a larger piece of matboard for our background,  but you could use construction paper or even tagboard.  I encouraged C to glue smaller pieces on top of the first pieces to create more depth.  If she wanted a certain shape,  I was there to cut them for her.  I guess I was her assistant!?


C continued to work very diligently which made me very proud!


Here is C's finished work again!


She even inspired me to do one too!


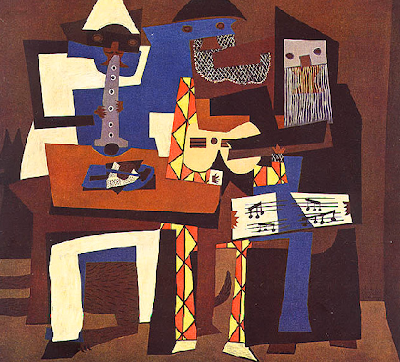
Mine reminds me of the Three Musicians painting by Pablo Picasso!!
(I think in colors mostly)


Have you made anything with Matboard Scraps?

What would you make if you had a bunch of matboard scraps?
This post is shared with:

Tuesday, August 23, 2011

Plastic Lid Sun Catcher

I have a thing for sun catchers if you haven't noticed yet! If you have been following me a while you would know! Here is yet another sun catcher project done with a clear plastic lid and colorful permanent markers! Here is C's fabulous flowery sun catcher! (notice the ants too?) This girl is still obsessed with Ants! (Ant Art Projects post)  Love how this turned out! Too simple!!!


First, gather some plastic lids from berries, vegetables, or bakery.....or whatever you can find. The tricky part is finding a lid without any stickers or labels.


Grab some permanent markers,  and your ready to draw!  I found it was easier to see what the Artist was doing if a white piece of paper was placed underneath the lid!


Here is the artist working hard!  It helps to draw the picture in black marker first and fill in with color to make the drawing stand out better!


The Artist finishing up!


Lastly, punch a couple of holes at the top and string a ribbon and then it is ready to hang!!! Easy and beautiful!


Sunday, August 7, 2011

Our Plastic Bottle Water Wall

This has been on our Summer List of Things To Do and we finally completed our Water Wall.  It went through many changes,  but this is our final result.  We used pegboard,  plastic water bottles, and zip ties.
Thank you to everyone who inspired us to create one!  There are so many great Water Wall ideas out there in the blogosphere!  Be sure to check out the links after this post!


The zip ties were looped around the necks and main parts of the bottles and then through the holes in the pegboard.  To make the longer tubes,  I cut off the bottoms of the bottles and stuffed another bottle through the cut end.  In some instances multiple bottles were placed together.  In some places I made holes in the sides of bottles to place the top of the bottle through.


Cassie tested the flow of the water each time I made a new change.  I envisioned funnels at the top,  but it ended up with just the cut off bottle bottoms.


It looked so boring with the clear bottles and white pegboard that we decided to use food coloring and water to pour through the passages.  Red water first!


Then green!


Then blue!


Ultimately,  our Water Wall was just too white and we both agreed to paint the bottles with acrylic paint!


Even though you cannot see the flow of water as well...I think it makes a COOl Artistic and COLORFUL Water Wall!  This was never how I envisioned our Water Wall to look,  but I am very Happy with it!


Some Great Water Wall Inspiration from these Great Blogs:


This post is linked to:
It's Playtime

Wednesday, June 29, 2011

Tin Can Magnetic Robots

I saw this idea over at the Family Fun Magazine  and knew that we had to do this! I'm sure glad that we did! Don't these Robots look Fabulous?  You'll need some recycled tin cans, various hardware pieces, plastic lids, pipe cleaners, strong disk magnets, and a hot glue gun. These robots inspired hours of imaginative play and were fun to create! Take a look at the fun we had...


First, we got together different pieces of hardware, lids, scrubbers, and pipe cleaners. 


Then we got our recycled tin cans together and some strong disk magnets.  Also, you'll need a hot-glue gun to attach magnets to the hardware and lids.


Cassie had a lot of FUN just playing with the magnets and the metal hardware even before we put anything together!  She made some Magnetic and Hardware Sculptures! Magnets inspire imaginations!


Here is C adding some hot glue to some plastic lids so she can attach the magnets.


Here she is pleased with adding the magnets!


After some of the magnets were glued to the hardware/lids, Cassie began to construct some robots. The nice thing is that the robots can be changed over and over! C liked using the scrubbers for hair. These were just placed on top of the cans without magnets.


More play going on here!


We added metallic pipe cleaners into the scrubbers for hair and then we were basically done. You could easily add more pieces or cans! Now there is a new toy to play with in our house!


These tin can robots inspired some robot drawings too! Love these drawings!


We hope to have many more hours of play with these Tin Can Robots!!!

What kinds of toys have you created with kids?