Showing posts with label sculpture. Show all posts

Monday, April 22, 2013

How to Make a Simple Pop Up

This past weekend we made pop ups.  We had received a pop up card and C was intrigued how the card was made so I decided to show her how to make a simple pop up. As an Elementary Art Teacher my students would always love making any type of pop up art. Keep reading to find out how to make a simple pop up.
Pin It
9x12 construction paper
Construction paper scraps
glue
 scissors

First fold the construction paper in half like this, but keep it folded.

On the fold, create two cuts that are about an inch apart.  You can create more cuts if you want more pop up elements.

Open up the folded paper and reverse fold the part you cut like this.

This is what the pop out part looks like from the side.

Lastly, cut out the shapes or objects that you want to pop out. If you want to add a second piece of paper to the back so there is no holes or if you want it to be a greeting card.

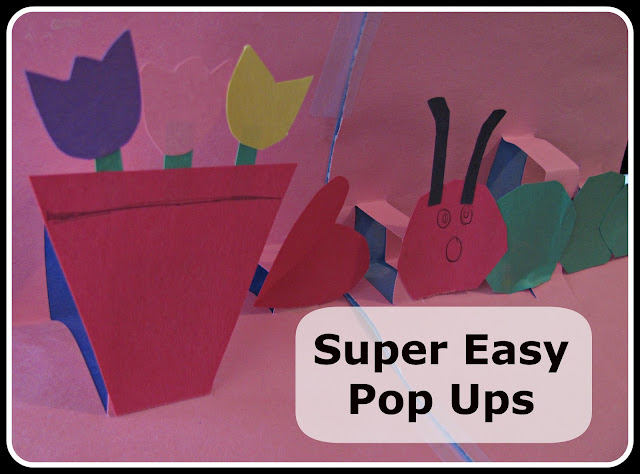
In our finished pop up, C connected two papers together and the caterpillar was popped out with two pop out pieces.

ENJOY MAKING POP UPS!

If you love making pop ups, you'll love this book:

Tuesday, January 15, 2013

Wood Scrap Sculptures

Wood Scrap Sculptures are so much fun.  I am lucky enough to have a Wood Shop Teacher in my High School so that I could make these with my High School Sculpture students and my daughter. You could probably get scrap wood donations from a lumberyard or Home Supply Store too. A great artist to correlate with this project is artist Louise Nevelson. She was a Wood Scrap Sculptor extraordinaire!


Pin It

Materials Needed:

Wood Scraps
Wood base to build on
wood glue
brush to spread glue evenly
Tempera paint


This was the invitation to build and make a wood scrap sculpture.

Here is the artist at work.  A brush and glue worked well for my daughter, but older kids would rather use the glue bottle. After building, let the sculpture dry.

Then you are ready to paint.  C really got into this part...painting upside-down.

Here are our finished masterpieces: # 1

Masterpiece # 2:

My High School Students loved this project too.  Here are some of their sculptures. A lot of them chose spray paint to finish them off.

Monday, January 7, 2013

The Value of Creating Snowmen

We never tire of making snowmen. I think I have made snowmen with my daughter ever since she could walk.  Not only is it a great excuse to get outside, but there is so much more value in this activity.  I must think there is value or else we wouldn't make them every winter.

Snowmen are so fun to make. They teach kids a lot. Obviously they teach kids about building and creating but there is so much more. When waiting to create a snowman each year I explain to my daughter about why the snow has to be a certain temperature before it can pack together(32 degrees and above), so there is definitely Science involved in the process. When we start building there is a lot of problem solving going on such as: "How large each "snowball" should be?"  and "Why the snow is falling apart....? and so on? Once the basic structures are built there are lots of decision making skills such as: "What will we make the eyes out of?" or "Who will the Snowmen look like?"

We had fun deciding to use pipe cleaners for mouths and pom poms for eyes/noses/buttons.  We lost our snowman kit so we had to be more inventive. We tried using candies too, but they wouldn't stay in very well and they were too small.

We also found if we used a popsicle stick to create a hole that the pom poms would stay in place more securely.

We had so much fun using our imaginations to come up with ideas for their hair.  We have always used hats in the past and the evergreen tree pieces and dead flowers made such a creative alternative. Snow Paint makes another great way to decorate a snowman too.

While making these snowmen my daughter commented on how these snowmen will make people smile
since our neighbors always enjoy seeing our creations. I think she remembered when we made a Snow Bunny and a neighbor put treats in the bunnies basket. So another value of creating snowmen could even be brightening someone's day. Once the snowmen begin to melt there will be a Science lesson on the temperature of when snow melts. The lessons are endless....Who would of thought?
Pin It

Wednesday, October 17, 2012

Pumpkin Pinch Pots

This is a great little project that I wish I could have done with my elementary art students, but then again I could do this with my High School students on a larger scale too.  High School kids (and adults) love holiday projects so it could be done with any age! I love pinch pots and making them into little pumpkins makes them even more fun! Keep reading to find out how my daughter and I created Pumpkin Pinch Pots. You could make them for any of the Autumnal Holidays.


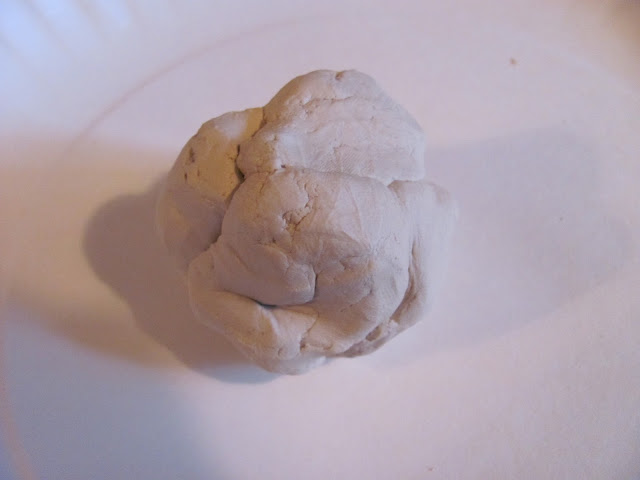
First we began with a small ball of Crayola Air Dry clay.  This is some amazing stuff.....almost as good in quality as Kiln Fire Clay.  If you don't have a kiln or access to one this is a great choice. There is link to Crayola Air Dry Clay at the end of this post.


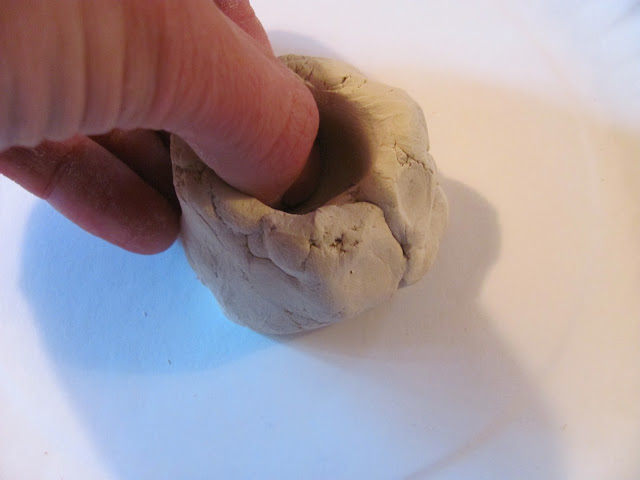
Then we put our thumb into the center of the clay ball.


Next we used our thumb to pinch out the pot to make it bigger.


And bigger...


We also fashioned some lids with a pumpkin stem.


After that that, we carved in lines for the ridges for the pumpkins.


Ta da!


And you can even make a jack o' lantern faces.


Pin It

Sunday, July 29, 2012

Duct Tape Flowers and Inspiration

Have you created with with duct tape before? On my own I have been recently working on creating duct tape flowers and it has been so much fun. Below are some of my first flowers I have worked on.  If you want some creative fun too,  I suggest you try your hand at it.  Here is the amazing video tutorial:  How to Make A Duct Tape Rose that I followed to create my flowers. Here is a tutorial for making a Duct Tape Rose Pen here, instead of using a straw you use a pen for the stem!


There are so many more amazing colors and patterns of duct tape than when I first created a duct tape flower about 10 years ago.  I wanted to buy all the different kinds of duct tape out there and if you check out Duck Tape Brand site here you'll see what I mean. (like a kid in a candy store)  I may incorporate this flower idea and other duct tape projects with my future High School Art Students.  I have always been intrigued by the Duct Tape Clothing that I have seen High School students make for their proms. On the Official Duck Tape Site they showcase a contest called Stuck At Prom in which High School students create Prom costumes with Duct tape and in return they have an opportunity to win scholarship money. How cool is that? Be sure to check out the winners for 2012 here. Here are the first place winners:


While researching Duck tape projects, I also came across this book: Stick It!: 99 DIY Duct Tape Projects by: T.L. Bonaddio, which has great ideas and inspiration for Duct tape creations.  I hope to be posting more duct tape creations in the future.


 Pin It

What Have You Created With Duct Tape?

Wednesday, July 11, 2012

Legos and Magna Tiles: Small World Play

Magna Tiles continue to be the #1 Building toy in our household.  If you've been following me you would know how much we enjoy these fabulous toys!  Check out my previous posts about Magna Tiles: Magnificent Magna-Tiles  and Marbles and Magna Tiles.  Again,  they are quite pricey, but worth every penny! You will not regret buying these.  The coolest thing is that they are magnetic blocks and they create awesome geometric structures.  They encourage loads of creativity too!  My daughter received these Tiles when she was a 3 year old and she is 6 now and has been playing with them the past week almost every day.  One way she loves playing with them is in combination with her Legos.  She builds structures with Magna Tiles and uses her Legos for the small world play.  Check out some of the pictures.


Lego people relaxing in the Magna-Tile structures.


Vehicles and towers.


A lot going on in each successive room. Flowers, beds, and a horse. 


Such serious play going on.....I LOVE this!


Here is my daughter at age 3 and her Magna Tile tower!


Do your children combine toys like this?
 Please share.


Thursday, July 5, 2012

How to Create a Metal Tooling Mask

Those of you who have been keeping up with me realize that I have fewer posts because of my preparation for my new High School Art teaching job beginning this Fall.  See: What Will Happen to The Chocolate Muffin Tree).  Some of my future posts may actually feature some High School Art projects too...like this one.  My daughter and I have been working on lots of creative projects, but I haven't had the time to post as much lately. This particular project of a Metal Tooling Mask was intended to just be just a High School Project, but my daughter wanted to give this technique a try too. A lot of projects can be simplified so younger children can do it and vice versa.  Here is C's beautiful metal tooling mask.


To create a Metal Tooling Mask you'll need:
Metal Tooling Foil (aluminum, copper, and gold)
a stick with a dull point, popsicle stick
felt to place under the foil so no holes are made
felt for padding or magazine


My daughter wanted to just draw at first....I love her cute people!


Here she is just experimenting.


One thing I noticed is that the edges are sharp so I put tape around the edges.  The red underneath is a couple layers of felt. You might be able to use some magazines for padding too.  I helped C draw a big oval to begin her mask.


Then she started to to draw on the foil.  You can draw out the basic shapes first and then go back and do the tooling part.  I cut out the mask when she was ready to do more detail. Basically you are embossing foil.  A popsicle stick works great for pushing out areas and making them pop out.  You can flip the metal over to push out and turn it over to push in.  This metal is quite flexible, but be careful not to press too hard!


At the last step C took permanent markers to add color to the mask.


Here is my High School example.  I painted it with black tempera paint and while wet, rubbed off the paint leaving the paint in the deeper parts. This great idea I got by looking through Pinterest and found it here: Aluminum Masks from A.C. Art Department Blog.