Showing posts with label Turkey. Show all posts

Tuesday, November 20, 2012

Paper Plate Turkey Wreaths

Here is my last Thanksgiving post...Paper Plate Turkey Wreaths.  This can be a nice quick project to do before the holiday!


To create a Paper Plate Turkey Wreath you'll need:

a paper plate
scissors
 paint or crayons
real feathers or construction paper feathers
glue


First, draw a a circle in the inner part of a paper plate and add a turkey head within the circle.


Then, cut that part out.


Now, either paint the paper plate and let it dry or color it with crayons to make it a quick project without dry time.


Then,  add an eye, beak, wattle and feather lines. We used real feathers, but you could use construction paper feathers too. You can hang it on your door for a festive decoration.


Pin It

HAPPY THANKSGIVING!

Sunday, November 18, 2012

Turkey Pinch Pots

This is a fun clay project that can be done with fire clay, air dry clay, or even play dough. We've done it with all kinds of clays and doughs and it works well.  I've made them with elementary art students in the past and most recently with my daughter C.  These Turkey Pinch Pots make great Thanksgiving Day decorations and gifts.


To create Turkey Pinch Pots you'll need:

Clay or Play Dough (We use Crayola Air Dry Clay)
A pencil or a pointy object for adding detail
Acrylic or Tempera paint
Mod Podge if a shiny finish is desired


First,  begin with a small golf ball size of clay or smaller.


Use your thumb to create a hole, but not all the way through.


Pinch out the hole more by turning it.  Don't make it too thin because you want to add the head and tail later.


Pinch out the head and wattle.


Then pinch out the tail.


Use a pencil or toothpick to add eyes, wings , and detail on the feathers.  Now let dry for a few days if air dry clay.  If play dough, just have fun creating turkeys and make new ones the nest day.


Now,  paint the turkeys.  We used brown, orange, yellow, and red.


Then display or give as gifts.


Pin It

HAPPY THANKSGIVING!

Enjoy your family and friends this week and be thankful for them too!

Wednesday, November 14, 2012

Contact Paper Turkey Sun Catchers

We created Contact Paper Turkey Sun Catchers after realizing our dreary windows needed cheering up for the upcoming Thanksgiving holiday. Thanksgiving seems to get left out and I began brainstorming for some crafty ideas to make including this one.  Some of my beat ideas seem to come from these moments. Keep reading to find out how we made our Turkey Sun Catchers.


Contact Paper
Tissue Paper
Wire or String

First peel back the non-sticky layer of contact paper to reveal the sticky sheet side up.


Then start placing torn and crinkled sheets of tissue paper down on to the sticky contact paper.  We began with the brown turkey body, head, and wings.


Then added details on the head and add the feet.


Add colorful tissue paper for the feathers.


Then place the non-sticky layer of contact paper on top of the sticky and tissue paper layer.  Press down. Trim around the picture or turkey. Add string or wire to hang. Let the line shine through your creations for an upcoming Thanksgiving sunny day!


This is a turkey without trimming.


Pin It


Tuesday, November 22, 2011

Quick Turkey Art For Your Thanksgiving Table

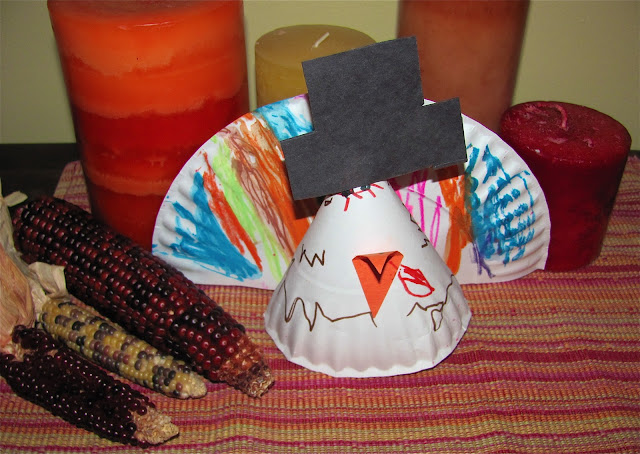
This is just a quick post that you might even be able to do on Thanksgiving,  especially if you are using paper plates and have some markers and crayons on hand! Here are our Cute turkeys that you can even set out on your Thanksgiving Table:


Here is how to make them.  First,  cut a paper plate in half.


Decorate one half with colorful feathers and the other half brown (or another color) for the head I added eyes,  but you could wait for that part until the head is formed in the next step.


Next staple the head piece into a cone like this and add eyes.


Add a construction paper beak, wattle, and pilgrim hat.  Staple on the feather part to the head and then you have a nice addition to your Thanksgiving display or dinner table!  Here is mine.


Here is C's turkey!


So simple and cute!  

Happy Thanksgiving to all my readers!

I am thankful to be able to provide creative inspiration to you each week!

Enjoy your families and give thanks for the simplest things!!!
*****
What simple things are you thankful for?


Monday, November 14, 2011

Coffee Filter Turkey Cards

This past weekend we made Thanksgiving cards with coffee filters, watercolor paints, and paper! I love using coffee filters for art because they are cheap and accessible!  We had quite an assembly line going and created over 20 or so cards!!! WOW!  C enjoyed making these turkey cards quite a bit!  We were inspired by Dilly Dali Art and their Spin Art Turkeys! They made Turkey Table Toppers.  Here is one of our finished cards.


First we painted coffee filters with watercolor paints.  Make sure to have newspaper underneath because they will soak through.


When the coffee filters are dry, cut them all in half like this.


Then glue the half of the coffee filter on a folded card or any paper if you don't want it to be a card.


Tear a piece of brown tissue paper (or construction paper) for the head.  We used two paper punch holes for the eyes and added black dots. You could use googly eyes too.


Now add a red piece of tissue paper for the wattle and a yellow triangle (and nostril holes) for the beak.


Finally, add lines for feathers and crumple brown tissue paper for the wings.  You could use real feathers too.  We drew the legs on and added grass for a background.  Simple and sweet! Very cute!


More cuteness!


They are adorable! Aren't they?  Don't you wish that you were receiving one?


Happy Thanksgiving!!!

This post is linked to: It's Playtime, Tip Toe Thru Tuesday, Thanksgiving Link-up