Showing posts with label paper mache. Show all posts

Thursday, April 14, 2011

Egg Shaped Lanterns

Ever since we did our Tissue Paper Mache Eggs from a previous post I've been toying with this idea and have finally completed it.  I really wanted the Tissue Paper Mache Eggs to be transparent, but we had to do a few layers so they did turn out beautiful, but they were opaque.  I was looking through Scribble Art
a great kid's art book by Mary Ann Kohl and noticed an idea for the yarn eggs, but at the end of the idea it mentioned putting tissue paper over it for an extension.  This was my light bulb moment and this is how these Egg Shaped Lanterns came to be!!! I Love how they turned out! I'm so pleased with these!


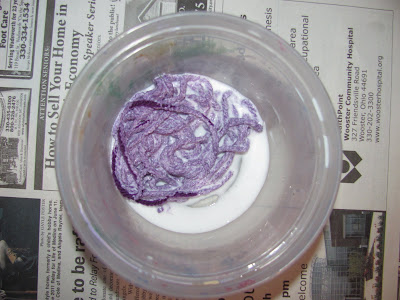
To begin,  cut some 12 inch yarn pieces----about 8 pieces or so.  You'll need white glue in a container--enough to soak the yarn in!


Soak the yarn in the glue for a few minutes. I spread out the pieces for Cassie because she cannot stand being sticky!!!


Set a water balloon in a cup (I cut down a yogurt container to fit) and you are ready to wrap yarn around the balloon.  You can take some glue off between your fingers, but leave most of the glue on the yarn!


Here is Cassie wrapping the yarn on the balloon. I had to help pick the balloon up to get it all around or it will easily fall off the balloon!


Here is our yarn wrapped balloon---we did 2 of these at a time!


Now for the tissue paper part---make sure it is not bleeding tissue!  I cut up some squares in put them in a pile.  Make  a mixture of 2 parts glue to 1 part water to apply the tissue paper.  We placed the tissue paper on the yarn balloon and went over it with a brush (Thank you Imagination Tree for the tip!) which made it so much easier to handle because your hands didn't have to get as sticky!


All you have to do is one layer and cover the balloon so that  it will be transparent.  Don't forget to throw some glitter on too!  The great thing is that this only took a day or so to dry and you are ready to pop the balloon and hang!  Love this idea!


I punched holes in the tissue paper and attached the yarn or you could attach it to the yarn of the balloon too! This seems like a great indoor patio decoration! 


WHAT DO YOU THINK?

This post is linked to:

Monday, March 28, 2011

Tissue Paper Mache Easter Egg Sculptures

Last week we were working on paper mache Easter eggs using torn tissue paper, glue mixed with water, and balloons. We experimented with larger balloons and water balloons that were left over from last Summer. The large balloons are great for a hanging decoration, but seem way to big for an Easter basket.  The water balloon size could be used for a hanging decoration and for a basket. Here are the large ones:


Cassie helped with the first layer or so, but got bored with the process so I ended up finishing these larger balloons.  If you were going to do this with a preschooler,  I'd recommend using the water balloon size to keep their interest! Some preschoolers may be fine with the larger ballon too.  To start this project, I tore some tissue paper:


I set the ballon in an old container while working on it so it wouldn't roll around.  For the water balloon, we used a small plastic cup.  We used two parts glue to one part water for the the mixture to put the tissue paper on the balloons.


Make sure to get off the excess glue mixture before applying it on the balloon. Cassie was not a big fan of the sticky glue mixture, so I gave her a wet paper towel to keep wiping her hands. Also, do not use bleeding tissue or your balloon or it will look muddy in color. I mention this because a few bleeding tissue pieces got mixed in with the non-bleeding kind.


Do a layer,  let dry,  and repeat this process for at least 2-3 layers.  When they are dry,  you can pop the balloon---Cassie really loved this part!  They may be a little flimsy in some areas, but once the ballon is popped ---I found you could blow air back in to them. Kind of cool! The water balloon eggs were not as flimsy.


Cassie did have fun with the process and was curious about these drying balloons in our kitchen each day! Boy, was our kitchen  an artist's workshop! I envisioned these Paper Mache Eggs to be transparent, with light sparkling through them, but they still turned out beautiful! You could use X-mas lights to put in them,  but I haven't gotten that far! Here are our water balloon size easter eggs:


I want to make more of these water balloon sized eggs.  They are a much better size for a preschooler too! They look beautiful hanging  too! Here are our large eggs again: (Notice there is glitter thrown in too!)


I was looking in the book: Scribble Art by MaryAnn Kohl and noticed the idea of making a starched yarn balloon shape (String Thing) and adding tissue paper over that.....maybe we'll try that too!  That may give us me more of the transparent effect that I was looking for because less layers of tissue paper would be needed!  Check out this site for Mary Ann Kohl books and free activity ideas: http://www.brightring.com/index.html


This post is linked to:


CRAFT SCHOOLING SUNDAY
MADE BY YOU MONDAY
MADE BY LITTLE HANDS MONDAY
NO TIME FOR FLASHCARDS
SHOW AND TELL
SHARING MONDAY
RUNNING WITH GLITTER
FUN FOR THE KIDS FRIDAY
AN ARTY CRAFTY PARTY
PRESCHOOL CORNER
CREATIVE JUICE THURSDAY
STRUT YOUR STUFF THURSDAY
UNDER 100.00
HOOKING UP WITH HoH
WE PLAY
THE PLAY ACADEMY