Monday, October 31, 2011

A Little Halloween Cheer!

Happy Halloween!!!
From my little Chocolate Chip Cookie!
(Maybe next year we'll make a Chocolate Muffin!)


I got the idea for this costume from Parents Magazine October 2010 issue!!
(no sewing....just cardboard, felt, ribbons, and glue gun!)

Did you make a costume for your children?

Sunday, October 30, 2011

Inspiration to Draw Owls !!!

Do you recognize this owl? It is from a T-shirt from our local Target that inspired us to draw owls for a couple days.  Owls have become very popular and I have noticed them cropping up everywhere! I explained to C that an Artist designed this owl on her shirt and she instantly was inspired to begin drawing owls!  I thought this was a good opportunity to teach Cassie about  "Art" being in our every day lives.  I talked to her about how our furniture, video games, computers, cars, shoes, houses, clothes, and even cereal boxes are designed by special types of Artists.  Most people don't even think about this! Do you?


Here is C drawing owls with her Owl shirt!!!


More owls!


Drawing owls the next day!


Even Mom was inspired by this shirt to draw owls!


It is fascinating to think about all the things that have been designed by Artists and it makes for a great discussion.  I hope you have or have had this discussion with your children!!!

Have you ever explained to your children that Art is all around them?

Have you ever thought about  Art being in your every day life????

This post is shared with:  Monday Madness

Friday, October 28, 2011

Pumpkin Puzzles

Yesterday we had fun carving pumpkins and all the things that go along with it!!  Cassie especially liked scooping out the stuff inside the pumpkins!!! I was thrilled because previous years she would not touch it! What a great sensory experience!!! C was also fascinated with the seeds and helping to carve and pull out the facial features too! The one thing she enjoyed the most was placing the pieces back into the pumpkin!!!  She said, "This is like a puzzle!!!"  So this is how our "Puzzle Pumpkins" came to be!!!!  As you can see I saved all the pieces below so she could continue the puzzles!  Be sure to check out the great links after this post relating to pumpkin carving!!!


Placing in an eye!


Now, the mouth!


Placing the top in is always fun!


This activity occupied C for at least 20 minutes or so!  She had a Great time!  I could see making some much more complicated "pumpkin puzzles" for the future!

What are your Favorite Pumpkin Carving Activities?

*** *** *** *** *** *** *** *** *** ***

 Links Relating to Pumpkins and Carving them:

A Virtual Pumpkin Carving Site for those of you who don't want the mess...very COOL!

Here is C's Virtual Carved Pumpkin
A variety of recipes for roasted Pumpkin Seeds (including cinnamon, lemon,  spicy)

Pumpkin Seed Art from Nestle!


This post is shard with: It's Playtime, Pinteresting Linky Party

Thursday, October 27, 2011

Contact Paper Fall Leaf Garland

Contact paper is always FUN and I decided to preserve some Fall leaves with it and ended up creating a garland!  I think it turned out pretty!  It makes such a whimsical Fall decoration! Before putting the leaves on contact paper,  I pressed them in books to flatten them out for a few days.


When the leaves were flattened, I placed our leaves on the sticky side of the contact paper and then put another sticky sheet on top.  C is still fascinated with the "stickiness" of this paper!  Maybe I should have her just explore a sheet fro sensory sticky play?


Then, after sticking the two sheets together with the leaves between,  I cut around the leaves, leaving an edge around them.


Then, I punched two hole through the bottom part of all the leaves.  They kind of look like ghost leaves!


Next, I strung the leaves with yarn.  You could use a pretty ribbon too.  I'm sure there are other ways this garland could be spruced up? What do you think?  This garland looks really pretty against a window with the light shining through the leaves!!!


We've used contact paper quite a bit with many projects!  Check them out if you never have:


I Love these New Contact Paper Projects from The Artful Parent:

What are your favorite projects to do with contact paper?

Tuesday, October 25, 2011

Four Ways to Use Glue (besides pasting!)

I've noticed I have quite a few posts using glue for other reasons besides sticking thing things together... so I decided to create a collection of all my post that relate.  If you or your children are a lover of using glue the non-traditional way... then this post is for you!!! Click on the picture or Title to bring you to that post.

Glue Spider Webs


What are some other non-traditional ways that you have used glue...???please share.
(we would love to try those ideas too!)

Monday, October 24, 2011

Simple Mask Making

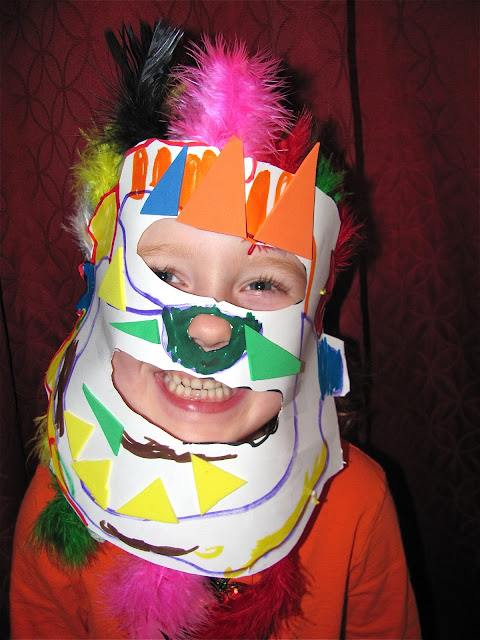
We made these simple feather masks the other day and they turned out so lovely!  Cassie enjoyed this activity a lot.... as most kids love making masks and wearing them!  This picture cracks me up because she truly looks unrecognizable to me! ***At the end of this post I have included some great links to visuals of masks around the world.  This will give children and adults endless inspiration to create a mask!  


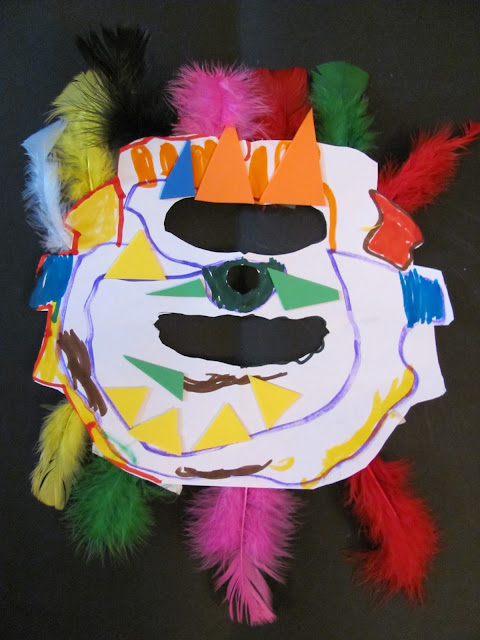
To make this mask we use a thicker white paper.  You could use construction paper, tagboard, or even white scrap booking pages! Fold your paper in half either vertically or horizontally.  Then on the fold I drew a slot shape for the eyes, a small shape for the nose, and a curvy mouth.


I made the shapes like this so that it would be much more simple for my daughter to cut out.  I wanted her to be able to cut it out herself and a "two eye"mask is too difficult for cutting.


After the facial features of the mask are cut,  draw whatever shape you want around the eye, nose, and mouth.  The shape could be curvy, zig-zag, or both!


When the main part of the mask is cut out,  begin to design with markers or crayons.  With older kids you could talk more about symmetry by making each half of the mask the same.  For example: If there is a red circle on the top left,  then make sure there is  a red circle on the top right of the mask!


After the marker designing, C added feather with tape on the back of the mask.  She also added foam shapes for more dimension.  You could also simply use construction paper scraps or whatever else you want  to embellish the mask with!


Here is the mask ready to wear or display!


To make the mask wearable,  I simply put a long paper strip of thick paper on one side, measured C's head, and attached the other end with a second staple on the other side.  I stapled near the eyes so the strip kinda rests above the ears.  The mask can be slid over the head to be worn.


Inspiration to Create a Mask!!!!

***Most children think masks are just for Halloween, but it is great to share with children the variety of masks that there are from all over the world. Children love looking at masks and love talking about them too!  Here are some links about all kinds of masks with pictures.

Masks of the World (including Japan, Peru, Greece, Egypt, China, and more!)

Masks from around the world (a great site with masks you can purchase that are from South America,
Bali, North American Indian, Mexico,and the list goes on....)

Or just do a Google Image Search of: Masks From Different Cultures and you'll get a fabulous display of masks!!!!

Happy Mask Making!!!

This post is linked to: It's Playtime

Saturday, October 22, 2011

Monster Fingers and Eyeball Dip

Tracy from the California Black Olive Committee asked me to create a "spooktacular" Halloween recipe/craft in promotion of their delicious product!  Ironically we are HUGE fans of  California Black Olives here at The Chocolate Muffin Tree!  We created a scrumptious Recipe for Monster Vegetable Fingers and Mushroom Eyeball Hummus Dip! What do you think?


We received an Awesome box of "stuff" (and more) to help us get started in creating our recipe/craft! Take a look! It was definitely enough to get us Super Excited about our creation!


Cassie even got into the action as you can see pictured here! We were just getting started!


Here is our Monster Fingers and Eyeball Dip!  A Healthy Halloween Treat!  I sliced up some carrots and celery for the monster fingers.  I added notches in the carrots and celery for wrinkles in the fingers. The split olives became the fingernails.  I used hummus to make the olives stick to the vegetables.  Button mushrooms with sliced olives dipped in hummus became the eyeballs!  


I had a lot of FUN with this and almost wish I could have a job doing  creative food projects like this!!!
I'm so Thankful that the California Olive Committee chose me to be involved in this project! Yay for me!

Some Amazing Information about California Black Ripe Olives:

- California olive growers produce more than 95 percent of the black ripe olives grown in the U.S.  These growers operate multi-generational family farms from the inland valleys of California from San Diego County to far north of Sacramento County.

- From breakfast to dinner.  January to December.  And from every day to gourmet.  Olives are as casual or as elegant as you like,  adding color, texture and flavor to any meal.

- You can "like" California Black Ripe Olives on Facebook here.

- For more information (recipes, history, nutrition, industry)  about California Black Ripe Olives go to:


WE  LOVE CALIFORNIA BLACK RIPE OLIVES HERE!

Thursday, October 20, 2011

Cute Little Clay Pumpkins

We created tiny little pumpkins!  I can imagine them in a little pumpkin patch....especially on this brown table.  Maybe we'll add some green leaves and vines later!!! They were a lot of fun to make and they will add to our Fall decorations to display each year!  For our pumpkins we used Sculpey Clay,  which you can bake in your oven.  You could use any type of clay you want!   Be sure to hollow out the bottom of the larger pumpkins or they will not bake well.


To create the pumpkins we formed a ball with a little stem to start.


Then we used a pencil to add the lines in the pumpkin.


Then Cassie kept making more and more.... and more!!!!  She really enjoyed making them!  Then it was time to bake them! For Sculpey,  you bake them for about 20 minutes at 275 degrees and longer for the larger ones.


Now it was ready to paint them!  C enjoyed painting them even more than making the pumpkins!  First we painted all the orange parts.


Then we painted the green stems!


Here they are drying!  Pretty Darn Cute!


Finished Cute Little Clay Pumpkins!


Aren't they such a cute Fall Decoration???

What sorts of things have you made with clay lately?
This post is linked to: It's Playtime, Sunday Showcase

Tuesday, October 18, 2011

Styrofoam Monster Sculptures

I saw this idea for Line Sculptures at Art is Basic and we kind of combined it with our Styrofoam and Toothpick Sculptures to make Styrofoam Monster Sculptures!  I was just going to show Cassie how to create different kinds of lines with pipe cleaners: curvy, zig-zag, spiral, and she ended up wanting to create these monsters!


To create this project we used styrofoam scraps, pipe cleaners, sharpie markers, and pencils.


C's favorite technique was wrapping the pipe cleaner around the pencil to create a spring/spiral line. She wanted to make this over and over! Good fine motor skills! She added a face on the styrofoam and the pipe cleaners were like the monster's hair!


This was C's finished creation. 


Here is mine.


We had a lot of fun and C keeps asking to create more of these monsters!

Monday, October 17, 2011

Oil Pastel Decorated Pumpkins

We were using oil pastels the other day when making our Colorful Bumpy Spider Webs and these pumpkin gourds happened to be sitting on our table.... so they got some color too!!!  Cassie enjoyed coloring on this different surface.  It was just a spur of the moment experience I thought I would share! They are really cool!


Here you can see that we had just finished our Colorful Spider Webs and C happily coloring away on these cute pumpkin gourds!


You could use markers, crayons, feathers and buttons like Tinkerlab,  paint like My Creative Family, Sparkles like The Imagination Tree,  and even play dough like Teach Preschool to decorate your pumpkins! The ideas are endless!


What other ways have you decorated pumpkins?

Saturday, October 15, 2011

Colorful Bumpy Glue Spider Webs!

Another Spider Web Project!!!  These turned out really COOL!!! We made Spider Webs with glue and then colored inside the spaces to create some really AMAZING works of art!!!  Here is Cassie's finished work:


To create an amazing Spider Web with glue, you may first want to practice drawing Spider Webs like we did in this post: Drawing Spider Webs.  Since we've made spider webs before, we started with glue on black paper. Start with a small circle in the middle of the paper and creating larger circles with each successive one.  These are concentric circles.


As you can see,  C had about 5 circles already!  You can do as many circles as you want!!!


Then create lines from the center circle branching out to finish the drawing part of the spider web.  After you finish this part, let the glue dry  on a flat surface over night!


The glue will dry to the color of the paper (black in this case) and it will have COOL bumpy texture!


To make the spider web stand out and make it colorful we used Crayola Oil Pastels.  We colored in between the spaces.  You could also use colored chalk or chalk pastels too!  Basically you can use anything that would show up on black paper!


I was pleasantly surprised how much C enjoyed coloring her spider web in with oil pastels!  She did a Wonderful job!  Oil pastels are FUN to color with because of their soft and creamy texture!   Maybe that is why she did such a Fabulous job?


After she finished the color,  spiders were added with black oil pastel! What a Fabulous Halloween or any time decoration!


What Do You Think?

***Be sure to check out our How To Draw a Spider Web post and Halloween Greeting Cards post for some other great Spider Web projects!

***Also, at the end of our How To Draw A Spider Web post I have lots of great links to Spider facts,  Spider Web facts, and Spider Books!!!

This post is shared with: Craft Schooling Sunday, No Time For Flashcards, It's Playtime
****
If you enjoy my blog...last day to Vote For Me here or click on the button below!!
Thank You!
http://blog-awards.parents.com/blog-awards/mom_blogs/477-the-chocolate-muffin-tree