Sunday, July 31, 2011

Floating Sponge Sculpture

We created more floating sculptures!  Instead of using Pool Noodles like we did before, (my Pool Noodle Sculpture post can be found here) we used foam sponges!  I found these multi colored foam sponges at the dollar store at 12 for a dollar.  These Sponge Sculptures transformed into boats for C's small toy figures and encouraged a lot of imaginative play!


First,  Cassie and I cut up the sponges in to various shapes.  Then we just started building with them.  It was fun to create the three dimensional shapes and instantly create a sculpture!


We used a low temperature glue gun to connect the pieces of sponges.  Poor C ended up burning herself (bandage on her arm),  but continued to work through till the end!  Be Careful!  If you are worried your child will get burned,  you could have them build it and then you could assemble it.  You could also use other glue (like fabric glue),  but it would just have  a longer dry time.  You would also have to make sure the glue was waterproof if you want your sculpture to be floatable.


Finished robot sponge sculptures!


We tried them out in water, but found out the bases of the sculptures were too small and too tall.  They kept falling over!


So we rebuilt some with wides bases and did make them as tall and that solved the problem!


C had fun playing with her Floating Sponge Sculptures/Boats.! She enjoyed putting her small toys on them and having them sink. Since they are sponge material,  every once in a while you'll need to squeeze out the sculptures because they will get heavy and sink a little.


If you don't want to build,  you can also float toy figures on these sponges too!


What have you and your children made with sponges???


More Floating Fun:
Be sure to check out my Floating Pool Noodle Sculpture Post here.

This post is linked to:

Saturday, July 30, 2011

Salty Watercolor Painting

This was a guest post over at Moms by heart and I just wanted to repost it for those who didn't get a chance to see it! Cassie loved this Salty Watercolor Painting when she was a young 3 year old and still loves it each time we revisit this process! All you need for this activity is salt, white glue, watercolors, brush, and stiff cardboard or matte board. (a piece of cereal box would work too!)


First, draw an image with glue on cardboard. We used a scrap of matte board. Cassie chose to draw a person and my image was more Abstract.


Next, sprinkle salt over the wet glue drawing and coat all of the glue.  It helped to use a spoon to cover the whole drawing.


After the drawing is covered in salt,  gently shake off the salt or tap the edge of the cardboard on your table covered with newspaper.  It will look like a sparkly "raised" drawing at first!  ***Note: The glue does not need to be dry!  The next step can be done immediately!


The fun part comes next,  take a paintbrush dipped in water and mix it into one section of watercolor paint and gently touch the tip of the brush to any part of the salty drawing.  The watercolors slowly seep into the salt drawing.  SO COOL to watch this magic happen!


Keep adding different colors and wash brush between colors.  Lovely!


Here is Mom's more Abstract Salty Watercolor Painting on black matte board.


We definitely both had FUN!

Be sure to check out my post on Glue Printing here.
This post is linked to:

Tuesday, July 26, 2011

Kool Aid Tie Dye T-shirts

We decided to try one more Kool Aid Project....Tie Dye T-Shirts!  It was definitely a FUN process to learn about the procedure of Tie-Dye, but unfortunately the Kool Aid washes out! (I wonder if using more Kool Aid packets would it work?)  I would recommend to do this purely as a "process project" or maybe just dye something you will not have to wash! (Like our Tie Dye Baby Wipes with Kool Aid!) My Tie Dye Baby Wipes project is featured here,  if you haven't checked that out.  The final product could be a framed work of art rather than a T-Shirt.  I researched further and found out that you can only use Kool Aid as a permanent dye on animal fibers such as: wool, mohair, alpaca, and human hair!!!  Here is C's  Kool Aid Tie Dye Shirt before it was washed!


The recipe we used for the Kool Aid Tie Dye Shirts can be found here. To make the dye for the shirt, first we put a packet of unsweetened Kool Aid in each container.


Then,  put one oz. of vinegar in each container and stir.


Next, fold and twist your t-shirt  and put rubber bands around it!  Patterns for shaping your shirt to create Spirals, V-patterns, and Random circles can be found here.


C used an eye dropper to apply the different colors of Kool Aid to her shirt.  (no worry about the kool aid dye staining her hands with the eye dropper!)  She LOVED this part!


More concentration and more colors! The directions were to set it in the sun to dry.


It said if you iron the shirt on medium high that it will set the colors (we did that!).  Also, to wait 24 hours before washing (we did that!).  The colors faded to a very light color!!!  You don't want to see a picture of that!  Here is C sporting her Kool Aid Tie Dye before the wash!!!!  At least I took a picture!


I'm still tempted to try this again and use more Kool Aid packets to see if it would work better!

   Have any of you had success with Kool Aid and Tie Dye T-Shirts? 


More Kool Aid Fun: Using Kool Aid to dye Wool/Yarn.
                                                       

Sunday, July 24, 2011

Mud Bakery

We created a mud kitchen in our backyard with so much inspiration to make one...we just had to!  Check out the links below for our inspiration! We've always played in the mud, but never made an official Mud Kitchen. Just gather some old kitchen items and some mud and you have a mud kitchen.  I saw a toy kitchen in the trash...which would have been perfect to put in the backyard for a more official Mud Kitchen! Ours turned out pretty well though!  Take a look...


Creating soups and stews.


Mud cookies with sand sprinkles on a matte board cookie sheet.


A true Mud pie with leaf decorations.


Everything went into our mud oven on the deck.  Cooking in the sun were mud cake pops, chocolate mud muffins, sweet gum treats, sand sprinkled cookies, and the pie.  They took a day to cook in the sun/deck oven!


The next day the items in the oven were done! Mud cookies!


Chocolate Mud Muffins!


Mud Cake Pops!


C continues to make mud soups and stews....her favorite concoction! A Wizard Stew is what she said this was!


Hope you are inspired to create a Mud Kitchen! A Frugal way to have fun and inspire imagination!

Our Inspiration to create a Mud Kitchen:

Outdoor Concoctions Kitchen from The Imagination Tree


Thrifting for a Mud Pie Kitchen from TinkerLab


Mud Pie Kitchen Renovation with over 30 links from Child Central Station

Friday, July 22, 2011

Painting With Ice Cubes

We painted with ice cubes that had tempera paint mixed in them! I saw this idea in the most recent issue of Parents Magazine.  It looked like fun, but it did not turn out the way I expected it to!  Here is one of our paintings halfway through the process.  The ice cubes look like colorful crayons!


The day before we followed the recipe to make the paint ice cubes.  First,  you put one teaspoon of tempera paint in each section of an ice cube tray.


Then you fill the rest of the section with water and stir with a toothpick.  We used the back of a spoon to mix because it seemed to mix up better.


After they sit 10 minutes,  stir the paint in again.  Now your ready to freeze them!


We popped the painted cubes out and were ready to begin.  C thought the cubes were cool.  She wanted to try every color.


C was more amused with her hands getting painted and said she was done! She wanted to hop in her pool since it was a 90+ degree day here! I don't blame her!


I encouraged her to paint more and then I gave her a larger paper to put handprints on!


Then I gave her the idea of just setting the painted ice cubes on paper and to let them melt! Cassie liked that idea immediately!


After the cubes melted a bit, C moved them around on the paper by lifting up the edges of the paper.  This started creating these fabulous speckles of tempera paint!


More melting of the ice cubes and moving around the paper was creating a wonderful painting!


Ice Cubes were almost melted at this point!  I love the painting even more!


A finished painting here! Still wet, but beautiful!


Another painting and very pleased with these unexpected results!


What Do You Think?

What projects have you tried that have given you unexpected results?

Wednesday, July 20, 2011

Octopus Obsession

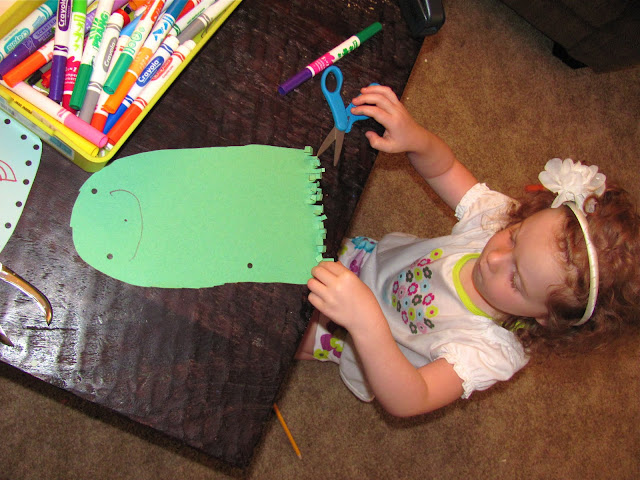
When children make or create things they tend to make things in multiples if they are given the space and materials.  During the past year and most recently, Cassie has been obsessed with creating these "Octopus Creatures" shown below. They are made with paper, scissors, markers, a stapler, and a hole puncher.  C loves having the independence of using special tools like the stapler and hole puncher.  I think she has made over 40 or so of these creatures!


First, she rounds off the top for the body and head and then fringes the bottom of the paper for legs! Lots of legs!


Then she uses markers, hole punch, and stapler to decorate.  She loves these two tools! Stapling just to staple and not attaching anything! Hole punches for eyes or decorations!


Here is her "White Collection of Octopuses"! I Love these creatures! There are so many more to show!


I've even tried my hand at making a few since she insisted!!! 


I hope you are having children create independently to come up with their own ideas! You will be amazed what children will come up with when given the opportunity!  

What independent Art Activities have your children been working on?

Have your children made collections of Art?

Monday, July 18, 2011

Rain Shadows

We were inspired by Land Artist Andy Goldsworthy after viewing his film Rivers and Tides to create Rain Shadows! It is a fabulous Artist documentary if you enjoy that sort of thing.  The artist creates one of these rain shadows during the documentary!  Cassie actually enjoyed this film and has been inspired to create other land art too!  Basically to create a Rain Shadow you need to lay down on the pavement just before it starts to rain and lay still until it looks like the rain has covered the pavement around you.  Then when you get up you should see your Rain Shadow.  Cassie and I were lucky enough to be around right when it began to rain and tried this. I laid on my back and C was on her side.  it was very refreshing and freeing laying down and letting the rain fall on you, but I'm not sure it was for C! Here are our Rain Shadows!


Looking at our Rain Shadows!


We tried creating some Rain Shadows by spraying the hose over each other too! It was more difficult to get the water to come down without going under our bodies!  You would probably need to spray the water up higher so it would fall more like rain.  Also with such HOT pavement it made it difficult to lay down! BE CAREFUL!

Before!
After!

OTHER IDEAS FOR RAIN SHADOWS:

You could also try different objects to see what rain shadows that they create.

Also, you could observe natural occurring rain shadows left from parked cars or trees that the rain cannot rain through because it is a light rain!

WHAT DO YOU THINK???
This post is linked to: