Collage

Tuesday, December 31, 2013

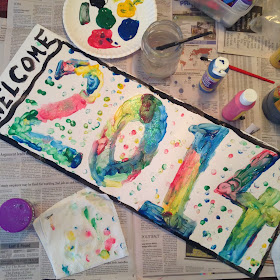
New Year's Welcome Banner

Are you excited for the New Year and what it will bring? I hope it brings great things to all of you! What better way to welcome 2014 with a New Year's painted banner! Such an easy project that could be scaled down or made larger for your situation.
Pin It

All you need for this project:
A large or small paper/poster board
pencil
tempera paint
brushes or fingers!
glitter
any other material you choose

First begin by penciling in a "2014"or whatever year you are welcoming in.  An older child could do this themselves.  You can use poster board for a large sign or small paper.

Then begin painting.  We started with brushes but preferred using our fingers so it became a finger painting.  We added sparkly glitter into the wet paint instead of using glue later.  Lastly, we added black outlining, but you could leave it without that too.

Happy New Year!

Sunday, December 22, 2013

Super Easy Rocky Road Fudge

Here is another amazingly easy fudge recipe I'm excited to share.  Every year I make this Rocky Road Fudge for friends and family and everyone absolutely loves it! When placed in a fancy treat bag or cute tin it makes it even more extra special.  Your friends and family will think you've spent hours in front of a hot stove when you've only spent under 5 minutes. Really? So give it a try. If you love this recipe, be sure to try our Super Easy Peanut Butter Chocolate Fudge recipe here.

Pin It
Here is the recipe:

Super Easy Rocky Road Fudge
Ingredients:
2 cups semi-sweet Chocolate Chips
1 14 oz. can sweetened condensed milk
1 teaspoon vanilla extract
3 cups miniature marshmallows
1 1/2 coarsely chopped walnuts

1.  Combine milk and chocolate chips in a large microwave bowl and stir.

2.  Cook for 1 minute in microwave.

3.  Add vanilla and cook for 3 minutes.

4.  Now add marshmallows and walnuts and stir.

5.  Press into a greased, foiled lined 13x9 inch baking pan.  Chill until ready.

6.  Cut into squares and serve.

7.  Enjoy!

Sunday, December 15, 2013

Super Easy Peanut Butter Chocolate Fudge

I've made this recipe for years and it is so ridiculously easy to make!  Total preparation and cooking time is probably under 5 minutes.  The long part is waiting for the fudge to harden in the refrigerator. So if you need a quick treat for gifts or a dessert this recipe will do the trick.  Everyone will think you took hours to make this... (everyone thinks I have every  time!)  
Pin It

Here is the recipe:

Super Easy Peanut Butter Chocolate Fudge

Ingredients:
1 oz. unsweetened Chocolate
1 14 oz can sweetened condensed milk
2 cup peanut butter chips
1 cup peanuts
1 teaspoon vanilla extract

1. Combine, chocolate, milk, and peanut butter chips in a microwave dish and stir

2. Cook 1 minute in the microwave or till smooth.

3. Stir in peanuts and vanilla.

4. Cook for 3 minutes in the microwave.

5.  Stir again until smooth and pour into a 8 x 8 pan and chill.

6.  Cut into squares.

7.  Put in fancy containers or bags to create a special gift of the sweet people in your life.

8.  Enjoy!

Monday, December 9, 2013

New Christmas Book: The Legend of Tommy The Tiny Christmas Tree

I'm excited to share with you a new book that I have been involved with that features one of my Christmas Art Activities at the end!!! The book that I am proud to present is a special Christmas story called: Tommy The Tiny Christmas Tree by Sidney Louis Fleishman and illustrated by Jeanne Carr.

It is about Tommy,  a little tree that stands alone wishing to become a Christmas Tree.  After many years, it seems hopeless, as though he will never get his wish.  Until one day, an unusual visitor comes to the forest. Will the visitor be able to grant Tommy's wish? A tale of wonder for children of all ages.
Pin It

The story and illustrations in this book are delightful.   Here is just a sampling of some pages of the book:


If you are looking for a new Christmas book to add to your library,  The Legend of Tommy The Tiny Christmas Tree will definitely fill that space. This book would make a great gift for the children or teachers in your life. You can purchase the hard copy of this book here for $14.99.  You can also purchase the book in E-book form on Amazon.com  here for $3.49.  Hope you enjoy the book as much as my daughter and I have.

This book is a special book because it is produced by Lucky Missy Publishing,  a start up publishing company with the belief that Magic Happens when amazing talents emerge! The founder, Michelle Scotton believes that a team should be fully involved when creating a book.  Many times when a book is created many people are working on it, but not collaboratively. This book was created by a team who truly had synergy and excitement through and through.

Saturday, November 16, 2013

Review: Roylco Straws and Connectors Building Set

Roylco sent us an amazing toy a few weeks ago: Straws and Connectors, and we absolutely loved it. Right away my daughter got constructing as you can see below. It is wonderful for fine motor control and is recommended for ages 4 and up. 


The set comes with 400 total pieces of straws and connectors shown here. So colorful and appealing to children (an adults like me!).

My seven year old daughter decided to build a huge building structure and then put blankets and pillows within it. It stayed in our living room for over a week and it became a structure for imaginary play.  This toy can be easily deconstructed and put away,  so it doesn't  take up much room when not in use. In the instruction booklet there were many examples of endless possibilities for creative building such as making rockets, cars, spheres, and so much more.

Roylco is an educational supply company with so many great resources for teachers and parents. They have endless products to purchase for Art, Crafts, Science, Math, Toys, Multicultural, Language, and so much more. Check out heir website here: Roylco.com. I know that you will find something that would be valuable for your children and their learning.

Pin It

Saturday, November 2, 2013

Dixon Ticonderoga School and Art Supply Review

Dixon Ticonderoga sent us some wonderful art and school supplies to try out a few months ago and we  have truly enjoyed their products these last few months. Having tried these products has also influenced me to order their art supplies for my High School Art classroom too. Keep reading to find out more.

When we first received these products my daughter C got right to work on a watercolor painting using Prang's fabulous 8 color set Oval pan watercolor set. These are the BEST watercolors and I have even bought them for my High School Art students.  The colors are much more vibrant and rich compared to competitor brands. The nice thing about these watercolors are that you can replace the colors without having to buy a whole new set.  As a teacher, it is really a money saver to be able to replace colors and not have to throw away the rest of the watercolor set.

My daughter also added Prang Markers to her masterpiece pictured here.  She loved these markers and the advantage is that you can leave the caps off these markers and they do not dry out unlike competitor brands!!!

Here are some wonderful Watercolor paintings done by my High School Students using Prang Watercolors.  I will definitely continue buying this brand for my students.  I highly recommend them as an Art Teacher.

Another GORGEOUS painting!

I truly LOVE Ticonderoga Number 2 Pencils too. They say on the package that they are The World's BEST Pencil and I can honestly say that I agree with that statement!!!! They write so smoothly, are already sharpened, and stay intact.  Other competitor pencils tend to break, are difficult to sharpen, and just do not give the same quality writing experience.  My husband even stole the package of these  pencils and brought them to work and I was so angry and told him to bring them back!!!! I missed them dearly.  I will never buy any other pencil brand after trying these. Please try them and you will see...

We truly enjoyed these Dixon Ticonderoga Products and hope you try them soon! Visit their Website here to view other great products too. 

Sunday, October 13, 2013

What We've Been Doing The Past Month...(and we are on Instagram!)

Sorry I haven't posted in a long time. I have been super busy with the beginning of the school year teaching High School Art and with life.  I've been posting on Facebook and I'm now on Instagram if you want to follow me there. Here are some of the things we've been doing: painting bird feeders, making blueberry waffles (and chocolate chip too), starting first grade, making apple pancakes, riding bikes and playing with shadows, visiting the galleries of Artist Don Drumm, playing with Grandfather's toy train,  practicing Taekwondo and earning a yellow belt!, chalking sight words and hopping on them, making corn dolls, admiring flowers, making zucchini bread, playing with vintage Bristle Blocks, playing with Magna-Tiles, Playing String Games, playing with Bloonies, deconstructing my camera that fell in the ocean, riding our plasma car, drawing trees, writing stories, making buckeye land art and so much more.....

I miss posting here and hope to write some official posts when things slow down....will they ever?

Leave your Instagram handle in the comment section below and I will follow you back...

Wednesday, August 7, 2013

Recycled Box Puppets

Again, we've been looking at old posts and noticed my collection: 18 Creative Ideas for Making Puppets.  C wanted to make #2 the Box Puppets so that is what we made. There are so many great ideas on this list so please check it out if you need a puppet idea!
Pin It
Materials Needed:
Small Box (we used a granola bar or fruit snack box)
scissors
glue
colored paper
craft supplies to design (eyes,pipe cleaners....)

First, tape or glue the box shut on the opening. Draw with a marker along the middle of the closed box and lead over to each side and not the bottom. This will be a guideline of where to cut.

Now, carefully cut along the line that you just drew. Open it up and bend the the part that is not cut. Your fingers and thumb will go in the openings created on each side to make the box talk.

Then cover the box with colored construction paper or with any paper you have on hand. We used the box to trace around on construction paper to create the same size paper to glue on the box.

After you have the paper glued on the box, you are ready to add eyes, antenna, hair, or whatever you choose.
Happy puppet making!


Monday, July 29, 2013

Simple Straw Noisemakers

These are so unbelievably easy to make and with few supplies. We found this idea here from ScienceBob.com.  I didn't even think my daughter would think this was that great,  but it turned out to be a hit.  One never knows with kids, so with my experience I would say to just try things even if you think it won't have success. These straw noisemakers are something you'll want to bring outside.
Pin It
Supplies Needed:
plastic soda straws
scissors

First flatten out one end of the straw on the edge of the table.  On the same end cut the straw to a point (as shown below). Experiment with different cuts and lengths!

Then flatten it a little more and then blow on the pointed end of the straw. Blow closer to the end where the point is for best results. ScienceBob.com describes it as a duck call noise that it makes. You may need bigger lungs, so an adult may be able to do it easier. 
Try cutting the straw into different sizes for different sounds. Experiment! The science behind this is that the the two ends cut at points vibrate very fast to create a sound.

Friday, July 5, 2013

Making and Playing With Slime

I cannot believe we never tried this until now.....so worth the wait though. Find out how we created this slimey Fun. The pictures speak for themselves.
Pin It
To create stretchy and oozing slime all you need is:
Slime
(2 Recipes for Slime found here in my last post)
a strainer, colander, sieve, or anything with holes in it (we used a tennis racket!)

Basically all you do to create this AWESOME experiment is to place the slime on top of the item with holes and let it slowly ooze out.  You could hang a strainer up high or we placed a tennis racket on top of two kid stools on either side. Then let the slime do its trick.  I walked away for a minute or two and my daughter came yelling, "Come quick.....NOW!" This was ultimate excitement!
Looks like a brain.
SO Slimy and FUN.....

Hope you try this....do not wait as long as we did!

Thursday, July 4, 2013

Patriotic Coffee Filters

Happy 4th of July! This is a simple project to go along with the Summer holidays. They can either become a garland or become stand alone festive paintings. We got the idea from katydidandkid.com here.
Pin It
All you Need:
White Coffee Filters
Tempera Paint 
Paint Brushes
String/yarn
glue
newspaper


Paint your coffee filters. Make sure to lay down newspaper because the coffee filters bleed through. Let them dry.

Then either keep them as is,  maybe create patriotic flowers, or string them up into a bunting or garland!  All we did was fold them in half and glue them on to string.

Happy 4th of July!

Wednesday, July 3, 2013

Making Two Kinds of Slime

As I said in my last post, we've been reminiscing about old projects, experiments, and recipes in my blog books from Blog2print. This time my daughter wanted to make slime again after seeing the post here.  Not only did we make that kind of slime, but we also made a different kind of slime too. Keep reading to find out the 2 types of slime we made.
Pin It
Recipe #1 Slime:

Mix in one bowl:
3/4 cup warm water
1 cup white glue
few drops of food coloring

Mix in a second bowl:
1 1/3 cups warm water
4 teaspoons Borax
(Borax is found in the laundry section.  ****Borax should not be ingested and can cause skin reactions with some... so use your discretion!)

Pour contents of first bowl into second bowl and let sit for one minute without stirring. Then explore Slime #1!


Recipe #2 Slime:
1/4 cup water
1/4 cup white glue
1/4 cup liquid starch
few drops of food coloring

Pour all glue in mixing bowl and then add water.  Stir water and glue together.  Add food color.  Then lastly add starch. Then have fun with Slime #2.


Making the two kinds of Slime was fun in itself and this time my daughter could actually read the recipe, so making it a great reading activity and science experiment too.

We compared and contrasted the two kinds of Slime as we were playing with them:  Slime #1 was
more rubbery and Slime #2 was smoother and more squooshy.

Then very soon after, both slimes were mixed together....which ended all comparisons. (But it did prove that yellow-green and blue make green!)  Plastic bugs made a great companion for the slime play.

C covered the bugs with slime, tore it into tiny pieces, stretched it, and pressed bugs into it to make impressions. Slime makes for such creative and FUN play with endless possibilities.

Hope you are inspired to try out both recipes for Slime. 

 Do you know any other recipes for Slime?

Sunday, June 30, 2013

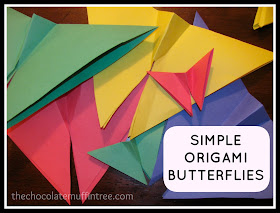
Simple Origami Butterflies Revisited

I had out my hard bound book copies of my blog recently and my daughter and I were reminiscing about all the projects we have done and how much they were enjoyed. It sure made my heart feel good!
If you are a Blogger and want a great way to preserve your blog without any fuss go to Blog2print  and you will not be disappointed. Here is C enjoying the blog books.....there is something to be said about turning the pages and holding a book as compared to a website.  I am so glad I have preserved these memories in physical form.

My daughter was so enamored with all the pages and pages of projects from my blog, but she finally stopped at our Origami Butterflies that we did back in 2011 and she was hooked once again.

Here is just a sampling of the butterflies she made. If you want to check out how to create these Origami Butterflies, the post is here. The post has a great step by step tutorial.
Pin It
We made an Origami Butterfly Garland too.  C even made more butterflies the next day.
I have a feeling we'll be recreating more and more projects from past posts!