Collage

Monday, January 28, 2013

Sweet Little Heart Cookies

We've made this recipe the past few years from Family Fun Magazine as Santa Hats, but since we forgot to make them for Christmas I told my daughter we could make a heart version of these for a Valentine Heart Cookie. They are basically a Meringue Cookie made with egg whites and sugar. Here is how they turned out:

Pin It
Ingredients Needed:
2 egg whites, at room temperature
1/2 teaspoon cream of tartar
1/4 teaspoon vanilla extract
1/2 cup sugar
Red colored sugar
parchment paper

First heat the oven to 200 degrees F.  Then beat the egg whites until soft peaks form.  After that, add the cream of tartar, vanilla extract, and 1/2 sugar. Continue to beat until peaks stiffen.  Then we put the mixture into a gallon size plastic bag and cut a corner off the bag for a makeshift piping bag.

Then on a parchment paper lined cookie sheet, pipe the hearts with the bag filled with the egg white mixture.

Next, fill the inside of the heart like this.

Here is C hard at work in the process.

Lastly, sprinkle the colored sugar on the hearts and cook for 1 hour and 20 minutes at 200 degrees F. Cook them until they are hard, but not browned. The recipe advised to turn off the oven and let the cookies sit for an hour before removing. ***We took them right out and they were fine.
My daughter loves these sweet cookies and we already need to make some more!


Wednesday, January 23, 2013

Wood Scrap Collage

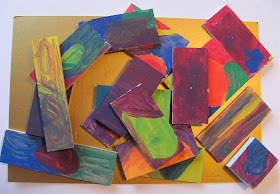
This is a continuation of our Wood Scrap Sculpture post. We had so much fun making our sculptures so we decided to just paint flat wood scraps and practice mixing colors on each wooden shape. Each individual scrap turned out beautiful, but when you put them all together they made some amazing Wood Scrap Collages.

Pin It

Materials Needed for Wood Scrap Collage:
Wood Scraps
Paint
paint brushes
Glue
Cardboard base

First gather some wood scraps. I've gotten wood scraps from craft stores, home stores, and the Wood Shop Teacher at the High School that I work at too. 


Then we just started painting and mixing colors on the flat pieces of wood. This was a lot of fun and many of these could even stand on their own as beautiful miniature paintings.

Then we started arranging them in different ways to create collages.  

Another way....overlapping.

This was a great activity....painting the scraps, arranging them, and just simply playing/building with them. You can glue them in the end or just leave them as is to arrange and rearrange. Hope we have inspired you to create some colorful scrap wood paintings or collages.

Tuesday, January 15, 2013

Wood Scrap Sculptures

Wood Scrap Sculptures are so much fun.  I am lucky enough to have a Wood Shop Teacher in my High School so that I could make these with my High School Sculpture students and my daughter. You could probably get scrap wood donations from a lumberyard or Home Supply Store too. A great artist to correlate with this project is artist Louise Nevelson. She was a Wood Scrap Sculptor extraordinaire!


Pin It

Materials Needed:

Wood Scraps
Wood base to build on
wood glue
brush to spread glue evenly
Tempera paint


This was the invitation to build and make a wood scrap sculpture.

Here is the artist at work.  A brush and glue worked well for my daughter, but older kids would rather use the glue bottle. After building, let the sculpture dry.

Then you are ready to paint.  C really got into this part...painting upside-down.

Here are our finished masterpieces: # 1

Masterpiece # 2:

My High School Students loved this project too.  Here are some of their sculptures. A lot of them chose spray paint to finish them off.

Monday, January 7, 2013

The Value of Creating Snowmen

We never tire of making snowmen. I think I have made snowmen with my daughter ever since she could walk.  Not only is it a great excuse to get outside, but there is so much more value in this activity.  I must think there is value or else we wouldn't make them every winter.

Snowmen are so fun to make. They teach kids a lot. Obviously they teach kids about building and creating but there is so much more. When waiting to create a snowman each year I explain to my daughter about why the snow has to be a certain temperature before it can pack together(32 degrees and above), so there is definitely Science involved in the process. When we start building there is a lot of problem solving going on such as: "How large each "snowball" should be?"  and "Why the snow is falling apart....? and so on? Once the basic structures are built there are lots of decision making skills such as: "What will we make the eyes out of?" or "Who will the Snowmen look like?"

We had fun deciding to use pipe cleaners for mouths and pom poms for eyes/noses/buttons.  We lost our snowman kit so we had to be more inventive. We tried using candies too, but they wouldn't stay in very well and they were too small.

We also found if we used a popsicle stick to create a hole that the pom poms would stay in place more securely.

We had so much fun using our imaginations to come up with ideas for their hair.  We have always used hats in the past and the evergreen tree pieces and dead flowers made such a creative alternative. Snow Paint makes another great way to decorate a snowman too.

While making these snowmen my daughter commented on how these snowmen will make people smile
since our neighbors always enjoy seeing our creations. I think she remembered when we made a Snow Bunny and a neighbor put treats in the bunnies basket. So another value of creating snowmen could even be brightening someone's day. Once the snowmen begin to melt there will be a Science lesson on the temperature of when snow melts. The lessons are endless....Who would of thought?

Pin It

Tuesday, January 1, 2013