Friday, April 29, 2011

Dandelion Cupcakes!

The other day we were collecting dandelions, purple flowers, grass, and other wild flowers in our yard and I immediately thought of this fun activity from The Imagination Tree! Their post is titled Goop and Flower Cupcakes and be sure to take a look at our inspiration! Cassie had such a blast with this activity. Lots of pretend play and creating your own recipe instead of following one! Here are our Dandelion Cupcakes that we created:


First we gathered all the flowers and grasses in our toy wheel barrow! Cassie Loves collecting natural objects and this activity in itself is valuable! One could create a nature collage with these materials too! These natural items that children collect are such precious treasures!


This activity was so spontaneous that I ran into our house for muffin tins, liners, water, flour , corn starch, bowls, spoons, and measuring cups! Good thing we had most the ingredients and materials, but I'm sure you could use what ever you want! Cassie had no clue what was going on, but she was excited!!! I told her that we were making cupcakes and that she could use all the ingredients that I brought out to create a recipe that she wanted!!! She had so much fun and it was great to hear the conversation she was having with herself about making her cupcakes!


Here is the beautiful mixture:


Cassie especially loved the cornstarch! Cornstarch in itself is a great sensory experience! We put some on our hands and it was so fun to feel it and run  our fingers through it! Cassie even put some cornstarch on our deck and smoothed it around and drew in it with her fingers! You can see that it got all over her face in the next picture! She could of kept making the mixture if I would have let her!


After we mixed up the recipe, it was time to put the ingredients in the cupcake liners! Fun! What a Great creation! Cassie made two trays of her Dandelion Muffins! It made a huge mess, but it was easily sprayed away with the hose! She was so proud of her creation and wanted to show her Dad and anyone else that came by that day!


Thanks again to: THE IMAGINATION TREE for inspiration! Please be sure to check out their post here!

WHAT ARE YOUR FAVORITE PRETEND PLAY ACTIVITIES???
This post is linked to:

Thursday, April 28, 2011

Exploring Yucky Worms

Cassie has been obsessed with worms lately and we've been playing in the dirt quite a bit! She is following  in my footsteps... since I enjoy gardening and playing in the dirt too! We happened to come across the book Yucky Worms by Vivian French at the library and fell in love with it!! It is a great story and it has some fabulous facts about worms that I've never heard before! If your kids are grossed out by worms it is a good book to help explain that they are not just yucky---and that there is so much more to these amazing creatures!


Here are some wonderful pictures of Cassie enjoying worms! I'm so glad that my daughter enjoys digging and playing in the dirt! She watches me garden and play in the mud all the time!


Here is Cassie still observing her worms! She enjoys letting the worms wriggle around her hand and tickle her! She quickly drops the worms back to the dirt! In the book it explains how worms move and that you should put them back after looking at them because the dirt is their home! Cassie learns quickly!


Here are the yucky worms we discovered underneath a huge rock in our backyard! Cassie loves looking for bugs too! In the book it explains the difference between a young worm and an adult worm! We quickly observed that too! We also observed why they come to the surface after it rains! It has rained here a lot lately and there is a reason you find worms all over the pavement! This book tells you why! 


***Here are some great worm facts that you could share with your children if you don't have time to check out this book: Top 10 Facts About Worms

***If you are wondering if there are any projects to do with worms? Here is one involving painting with worms!!! Painting with Earthworms is a Great Art Project for Your Preschoolers I think we would use spaghetti instead...I would feel I would be harming the worms!!!!

***Here is a project How To Paint With Worms on eHow (Thankfully it is pasta---I can do that!!!)


***Here is our link to our Spaghetti Worm Painting that we did after this posting...Take a look here!


***Build a "Worm Hotel" from Your Big Backyard Magazine here!
What creatures do your children like to explore in Nature?
***
What valuable experiences have your children had while observing Nature?
***
Would You Paint With Worms???
(We will be painting with spaghetti and pretending they are real!)

This Post is Linked to:

Tuesday, April 26, 2011

Play Dough (Play Doh) Snails

On Easter we were at Grandfather's house and he always has a ready supply of Art supplies on hand: crayons, paper, markers , glue, scissors, and play dough (Play Doh)!! No, we did not make play dough... we just enjoyed playing with it, smelling it, and tasting it! (I always catch my daughter eating it---good thing it is non-toxic!)  Next time we'll need to make some edible homemade play dough! We ended up making a whole family of snails!!!  Most kids Love making SNAKES and this is a great activity to follow up with after making a zillion snakes.


To create snails we started out by making a snake or coil which Cassie has become quite good at!


Next we simply shaped our snakes into spirals. Start at one end and slowly pinch the rest of the snake around it and squeeze around it to keep it together. This took a little skill...but she got the hang of it!


Leave a little end of the spiral out for the head and smash it down so it will stand up.  Lastly, add some eyes and a mouth.


Cassie really enjoyed this simply and sweet activity!  It is always fun to make a large quantity of anything! Love the winking pic! This girl is proud of all the snails we made!


This snail activity goes well with a book about a snail we have read: The Biggest House in the World by Leo Lionni. Also, the past year we have been collecting snails whenever we go to the pond near our house!  We do put the snails back! I'm sure we'll be making more snails during our next play dough session! Making snails is a great skill to be able to practice and to apply that knowledge to eventually create a coil pot!


WHAT FAVORITE THINGS DO YOUR CHILDREN CREATE OUT OF PLAY DOUGH???
This post is linked to:


Monday, April 25, 2011

DIY Crushed Chalk Paint

This has been one of our favorites for the past couple years! We've made the cornstarch recipe, but I was never satisfied with the brightness of the paint.  I think my daughter and I just like the process of making this chalk paint!  Cassie just Loves chalk paint and it is such a nice variation to using chalk sticks!


First you need some chalk, a plastic bag, and a hammer or mallet.  We can get chalk fairly cheap at discount stores, so I don't feel bad chopping it up! ***You could also use worn down pieces from your collection if you don't want to use brand new pieces!


Next, put about 2 pieces of chalk in a plastic bag, twist the bag shut and start crushing the chalk.  Be careful of your fingers!! I did some and let Cassie try it too.  It was very empowering for her to use the hammer and help!


After crushing the chalk you may want to check to see if you need to hammer more...we needed to a bit more to get some of the larger pieces.


Place your crushed chalk carefully in a container and then add about a cup or so of water. Mix with a stick or paint brush and now you have instant chalk paint! You can always add more water as you are painting if the water dissolves quickly.


Here is Cassie painting away! What fun! She started right away! As you can see we made 3 colors which makes it much more exciting!


We had a lot of fun! We made flowers, people, splatter paint, spirals, and even mixed our pink and blue to make purple!


This is my favorite chalk painting: Cassie and Mom


Mom had fun making this fireworks explosion!


Our array of work again:


DIY Crushed Chalk Paint has become a tradition we have done since Cassie was 2 1/2! I have a feeling it will continue from year to year!

Friday, April 22, 2011

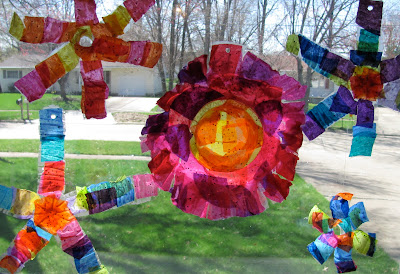
Recycled Bottle Flower Sun Catchers With Tissue Paper

This is the second part of my Recycled Bottle Flower Sun Catcher post. This time instead of using permanent markers to design the flowers we used colorful tissue paper.  I like both ideas! The tissue paper is nice because it is so much more vibrant.


This project has the same beginning steps of my previous post: Cut the bottle in half.


Then cut slits on the cut ends and flare out to create petals.


I like using both parts of the bottle.  So keep both to use for variation.  You could cut thinner petals, but the tissue would be difficult to apply.


After you cut the bottle, cut some tissue paper squares to fit the bottle.  My daughter was being really particular about the pieces fitting perfectly and wanting me to cut them smaller and I told her I could trim the edges after she was done. 


You'll need a mixture of 2 parts water to 1 part glue to apply the tissue paper. A paint brush worked really well to glue the pieces down.


Cassie enjoyed choosing the colors and applying the glue and water mixture with a paint brush. First we would apply glue on the bottle, lay down the tissue paper, and then brush over it.  Fill the whole flower and let it dry. It doesn't take that long at all!


Lastly, hole punch on the end of one of the petals and add string or yarn.  I used clear string this time and I liked that effect when hanging multiple flowers.  I think they look stunning! I love the color and light! I think I have done quite a few sun catcher projects---WOW!  Who doesn't love Stained glass or a sun catcher?  Here are a few that we did: Multi-color


Warm Colors (red, yellow, orange, pink)


Mostly Cool Colors (blue, green, purple)


This last flower is made with a large clear plastic container.  I really Love how this turned out!  I would like to experiment with more clear types of containers for this project! I tried a more durable container and nearly cut my finger off...ouch! SO.... Please.. Be Careful!


What other clear plastic containers could you experiment with to create recycled flower sun catchers?

The possibilities are endless!!!

I've been examining containers to see the possibilities...

***It sure would be nice to be in Babbles top 50! Click here to give me vote!

This post is  linked to:

Wednesday, April 20, 2011

Quick And Easy Recycled Water Bottle Flower Sun Catchers

I have a couple versions of these bottle flowers and we did the easier of the two. This is a great recycled project using those plastic water bottles that everyone has or can find anywhere! You could use a soda or any plastic bottle! Be sure to check out my tissue paper version here!


First you need to cut the bottle's top off and save both pieces! (I did this part)


Then cut into the ends of the pieces to create petals. An older child could do this, but you may want to do this for your preschool age child!  Cassie could cut a little herself!


This is the top of the bottle.  It looks to be a different piece from the original picture---but you get the idea? I think I cut this bottle directly in half.


Now all you need is some newspaper to protect the table and some permanent markers.  You may not think permanent markers and children mix, but I just keep a watchful eye over Cassie and she is fine!  She knows she is using Mommy's special art supplies----which is very exciting to her!


Cassie did an awesome job coloring her recycled bottle flower!  I was very impressed! Just punch a hole in one of the petals and attach some yarn and you have a simple easy fun flower sun catcher!


We will be working on another version of this to post in the future!  My variation with colorful tissue paper can be found here! Enjoy!  Check out more recycled projects here! Do you have any ideas for projects with recycled water bottles? Check out Tinkerlab's Plastic Bottle Challenge here!
Happy Earth Day!


***It sure would be nice to be in the Top 50 on Babble! Click here and give me a vote!

This post is  linked to:
WE PLAY
KIDS GET CRAFTY
IT"S PLAYTIME
FOR THE KIDS FRIDAY
FUN FOR KIDS FRIDAY
PRESCHOOL CORNER
CRAFT SCHOOLING SUNDAY
MADE BY LITTLE HANDS MONDAY
SHOW AND TELL

Monday, April 18, 2011

8 Easter Egg Ideas: An Eggstravaganza!

WOW! I have quite a collection of Easter Egg projects! If you need some ideas come on over! Just click on the name under the photo and it will bring you to the project and instructions! Quite an Eggstravaganza!!!


TIE DYED COFFEE FILTER EASTER EGGS
PAPER MACHE EASTER EGG DECORATIONS
PAINT CHIP EASTER EGG COLLAGE
MARVELOUS MARBLED EASTER EGG COOKIES
SPIN ART EASTER EGGS AND GARLAND
TISSUE PAPER AND YARN EGG SHAPED LANTERNS
ROLLED PAINTED WOODEN EASTER EGGS
NATURALLY DYED EGGS: MARBLED TECHNIQUE
WHAT ARE YOUR FAVORITE IDEAS???

LET ME KNOW IF YOU TRIED ANY....?

PLEASE SHARE SOME OF YOUR IDEAS!!!

HAPPY EASTER!!!


This Post is linked to: